


BALA ESP32 Development Mini Self-balancing Car
Description
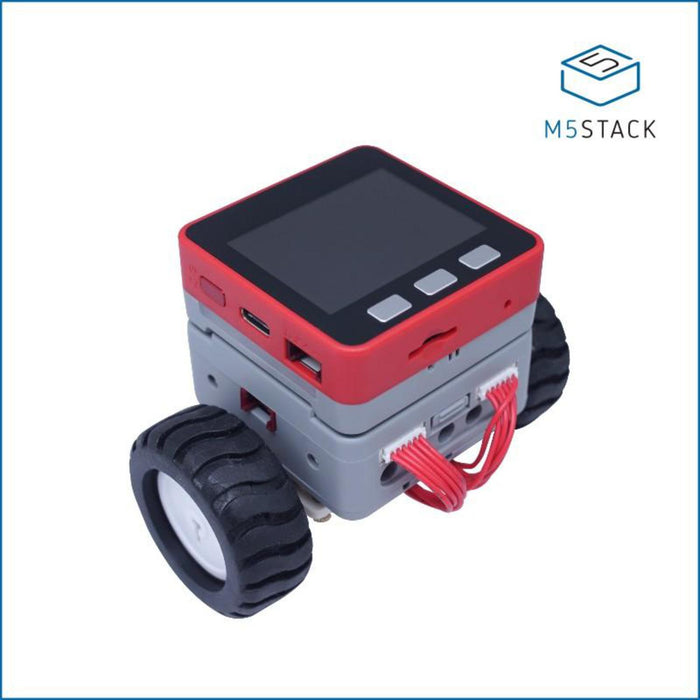
BALA is short for 'Balance', like its namesake, BALA is a Self Balancing Robot consist of a M5 FIRE and two wheels(DC motors).
This Application product comes with preloaded software, a self-balance robot application. While there are lots of open source code on Arduino as well, We especially encourage you to modify and enhance the code yourself.
This Self Balancing Robot is a Two-wheeled Robot that balances vertically using a closed-loop algorithm. This Self Balancing Robot Features various modes like Position Hold, Simple Mode, Rise Mode and Joystick Control. This Robot is controllable by a Smartphone device or a Transmitter. Self Balancing robot uses data from the Accelerometer and Gyroscope to correct its orientation and position.
The 2 DC driver module communicates with M5Stack FIRE through I2C bus. It's default I2C address is 0x56.
Product Features
- Programming Support
- Python
- UIFlow (Blockly)
- Arduino
- Compatible LEGO
- POGO Pin
- TF Card Support
M5Fire PARAMETER
ModelM5Stack FIREESP32240MHz dual core, 600 DMIPS, 520KB SRAM, Wi-Fi, dual mode BluetoothFlash16MB Flash + 4MB PSRAMInput5V @ 500mAInterfaceTypeC x 1, GROVE(I2C+I/0+UART), Pogo Pin x 1LCD2 inch, 320x240 Colorful TFT LCD, ILI9341Speaker1W-0928MicrophoneMEMS Analog BSE3729 MicrophoneLEDSK6812 3535 RGB LED x 10MEMSMPU9250 (MPU6500 + AK8963)Battery550mAh @ 3.7V, insideOp.Temp.32°F to 104°F ( 0°C to 40°C )Size54 x 54 x 21 mmC.A.S.EPlastic ( PC )Kit includes
- 1x M5Stack BALA
- 1x Motor Driver
- 2x N20(Encoder included)
- Type-C USB Cable

Learn
Prepare
- Install Serial Driver - How to Establish Serial Connection
Development Environment
UIFlow
- Download UIFlow firmware - How to dowmload Firmware
- WiFi Configuration - How to Connect wifi on M5Core
- Find the POGO Pin, and stack M5Core over M5Bala wheel.

- Click the Red button on the side of M5Core (double click for shutdown).

- Click the button on the side of M5Bala bottom to power on (double click for shutdown).


- Open UIFlow website, and switch programming language from
BlocklytoPython.

- Copy the following code to UIFlow and then click
Download.
from m5stack import * from m5ui import * from m5bala import M5Bala import i2c_bus clear_bg(0x111111) m5bala = M5Bala(i2c_bus.get(i2c_bus.M_BUS)) btnA = M5Button(name="ButtonA", text="ButtonA", visibility=False) btnB = M5Button(name="ButtonB", text="ButtonB", visibility=False) btnC = M5Button(name="ButtonC", text="ButtonC", visibility=False) title0 = M5Title(title="Title", fgcolor=0xFFFFFF, bgcolor=0x0000FF) title0.setTitle('calirate start') wait(2) sampleCount = 2000 gyroXSum = 0 gyroYSum = 0 gyroZSum = 0 for _ in range(sampleCount): gyroXYZ = m5bala.imu.gyro gyroXSum += gyroXYZ[0] # X gyroYSum += gyroXYZ[1] # Y gyroZSum += gyroXYZ[2] # Z gyroXMean = gyroXSum / sampleCount gyroYMean = gyroYSum / sampleCount gyroZMean = gyroZSum / sampleCount m5bala.imu.setGyroOffsets(gyroXMean, gyroYMean, gyroZMean) title0.setTitle('balance start') while True: m5bala.balance() wait(0.001)Arduino IDE
- Setting Arduino development environment - Establish Serail Connection - Get Started with Ardino IDE

- Install
m5stacklibrary inLibrary Manager.

- Install RGB LED
Buslibrary inLibrary Manager.

- Install
MPU6050_tocknlibrary inLibrary Manager.

Make sure that M5Core has connected to PC, then click
Tools->Portfor selecting the corresponding serial port on Arduino IDE.click
Tools->Board:to selectM5Stack-Core-ESP32orM5Stack-Fire.

git clone --recursive https://github.com/m5stack/M5Bala.git- Click
Sketch->Include Library->Add .ZIP Library.... selectM5Balayou just cloned from github.


- Open a bala example: Click
File->Examples->M5Bala->Basic.

- Compile and upload.


The BALA ESP32 Development Mini Self-balancing Car appears in the following collections: