

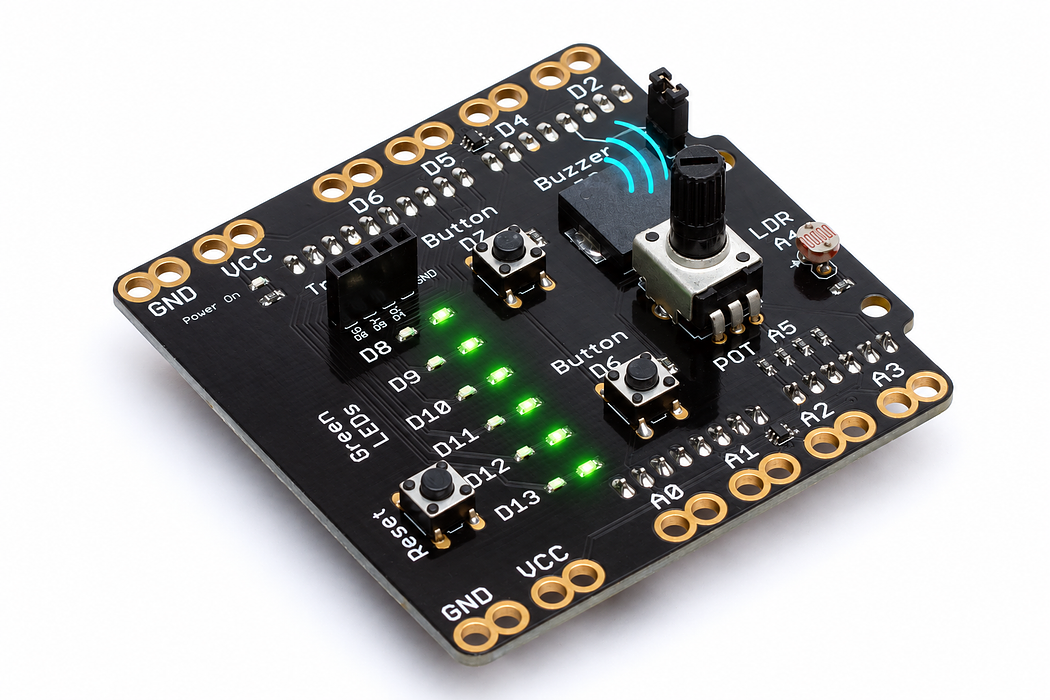
Give the shield a voice
Make two clear beeps and separate pitch, note length and the silence between sounds.
Step 1 — Predict the sound
You will make a repeating pair of short notes. The first is 440 hertz and the second is 660 hertz. Which will sound higher? Does doubling a note’s duration make its pitch higher, or just make it last longer?
By the end, you should be able to control pitch, note length and silence independently.
Before you begin
Read milliseconds and know a function can receive a parameter.
Your goal: Call a function with a parameter. Show this with a prediction, a tested change and an explanation using the program’s names.
Retrieve one idea: what input, state or output did you change in the previous project?
Need a reminder? Make a button remember.
Step 2 — Check the buzzer connection
The onboard piezo sounder is connected to D3 through its removable jumper. With USB disconnected, check that the jumper joins both pins. Reconnect USB for programming. No external speaker is needed.
To work quietly, unplug USB before removing the jumper and keep it somewhere safe. The program and its LED indicator still work when the buzzer is disconnected.
Step 3 — Program the shield
Choose Arduino Uno, then Verify and Upload the supplied sketch. The English instructions describe the same behaviour as the C++ beside them. Keep the USB cable connected while you test.
Step 4 — Listen for a pair, then a pause
You should hear a lower beep followed by a higher one, with D12 lighting during each note. There is a short silence between them and a longer silence between pairs. Follow the LED if you are working without sound.
Identify which part of the pattern comes from NOTE_MS, which comes from GAP_MS, and which comes from the final delay(800).
Step 5 — Explain what tone does
The piezo element flexes when driven by a changing electrical signal. tone sets how quickly that signal repeats: frequency determines pitch. Its third argument limits how long the sound plays.
tone starts the sound and returns immediately. Our explicit wait lets that note finish before the next instructions stop it. A delay alone does not create a new note or change its pitch.
Read this part of the actual starter
void loop() {
  beep(440);
  beep(660);
  delay(800);
}
beep(frequency) is a reusable function. Its unsigned parameter receives 440 or 660 on each call. tone sets frequency and duration; the subsequent delays control when the next code runs. noTone stops output explicitly.
Work through one case
First beep: 120 ms tone + 80 ms gap. Second beep: another 200 ms. The final 800 ms pause makes the sequence approximately 1200 ms long.
Your turn: complete the trace
beep(660) puts ___ into frequency; the note lasts ___ ms and its following gap ___ ms.
Compare your trace after trying
660 Hz; 120 ms; 80 ms.
If your answer differs
Separate the parameter in hertz from the constants in milliseconds.
Step 6 — Compose a three-note signal
Change only the second frequency to 880 and compare the interval. Next restore 660 and change NOTE_MS to 240; the notes become longer, not higher. Finally add beep(550); to invent a three-note “ready” signal.
Keep a record of the three frequencies and durations so a partner can reproduce your pattern.
Run a controlled experiment
Create a distinguishable three-note alert with a visual equivalent. Explain which value changes pitch and which changes duration.
- Save a copy of the working starter. Reset the board so stored state begins from the declared values.
- Write the expected result before editing. Change only the named factor; keep wiring and other settings fixed.
- Edit the C++ in the editor, Verify, then Upload to the connected Uno. The starter simulation does not execute your edited C++.
- Repeat the same input sequence. Record input, expected output, observed output and an explanation. Use labelled serial values where the sketch provides them.
- If the result differs, inspect the relevant condition and pin before changing another factor. Restore and upload the saved starter to recover.
Core task: explain one changed case. Optional extension: choose a boundary or timing case and justify the extra test. Use a paper trace or annotated screenshot when physical manipulation is inaccessible; distinguish predictions from measurements.
Step 7 — Check the result
Explain the difference between a 600-hertz note and a 600-millisecond note. Then change the long pause without changing either pitch.
- D12 flashes but there is no sound: inspect the buzzer jumper with power disconnected.
- Sound is continuous: keep both the note duration and
noTonecall. - The program will not verify: make sure each call has parentheses, a comma between arguments, and a semicolon.
Independent check — try before revealing
If NOTE_MS becomes 200 and GAP_MS stays 80, how long is one call, and has pitch changed?
Hint
Separate the parameter in hertz from the constants in milliseconds.
Reasoning and feedback
Approximately 280 ms; pitch is unchanged because the frequency argument did not change.
Frequency changes pitch, not volume. Provide a visual option and agree a comfortable classroom sound level.
If your explanation missed a condition or stored value, add that column to your trace and try a new input. A working upload alone does not answer this check.
Step 8 — Look inside the buzzer
The supplied sketch plays 440 Hz and 660 Hz beeps on D3, with short gaps and a longer pause between each pair.
Choose Cutaway and press Play animation. Compare 440 Hz and 880 Hz using Change the pitch; use Tone off to enable the optional sound. The visible bending is slowed and enlarged. Pause, then drag Inspect one cycle through rising, steady and falling voltage.
Predict and explain: During a steady-voltage part of one inspected cycle, does charge continue crossing the ceramic?
Check your explanation
No. The ceramic is an insulator. In this capacitive view, lead current accompanies voltage changes, stops during the hold and reverses during discharge. Restore 440 Hz, then 660 Hz to compare the two notes used by the sketch. Changing voltage bends the bonded ceramic and brass diaphragm. Charge moves onto and off the electrodes, reversing during discharge; it does not pass through the ceramic. Try Electron flow to see the opposite direction convention for the same electrical behaviour.
