

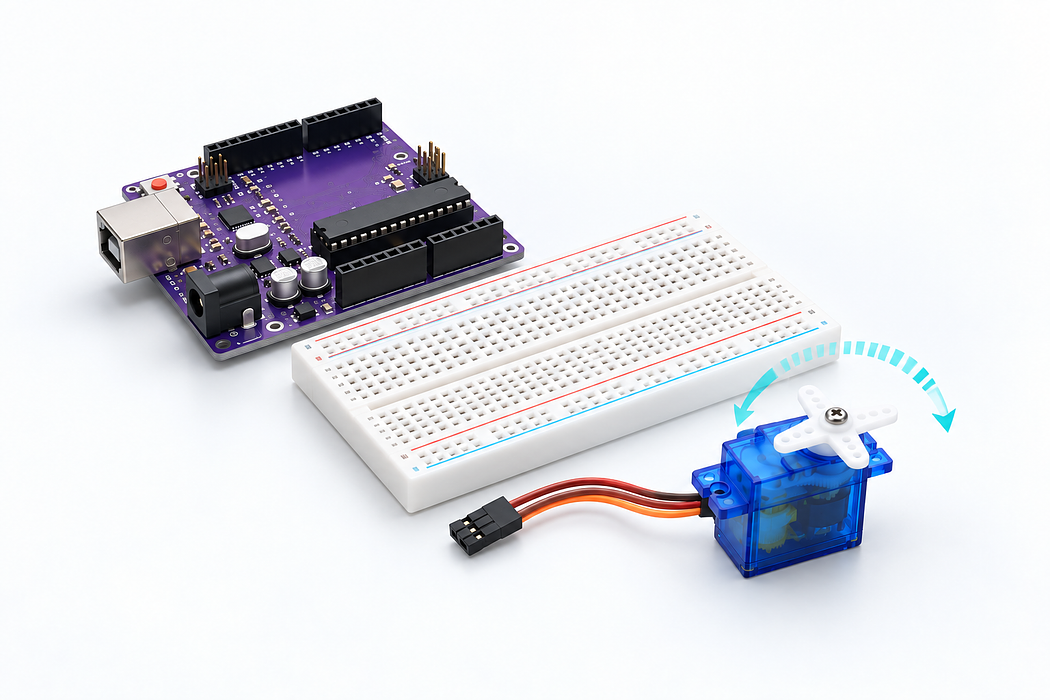
Set the SG90 servo angle
Attach a positional servo on D9 and start at 90 degrees. Accept serial commands angle:30 through angle:150 and report the commanded angle every 100 milliseconds.
Control one unloaded SG90 using the USB-powered Uno’s 5V pin, GND and D9. Leave the horn free to move; USB and servo variants differ, so external 5V power is the fallback if the board resets or the servo chatters.
Use the Uno R3 Learning Kit. Build with power disconnected, check the labelled connections, then upload the supplied sketch. Drag or zoom the 3D model to inspect it from any angle.
Step 1 — Watch the complete build
Press Play for the narrated build. You can rotate and zoom the model while it plays, or follow the individual steps below.
Loading assembly…
Keep U S B disconnected while you build. On this breadboard, each group of five holes shares a connection; the centre channel separates the two halves. You can drag the 3D view to look around. Connect the Arduino’s five volt output to the positive rail. Connect Arduino ground to the ground rail. Add the Micro servo · positional. Keep its terminals accessible for the connections that follow. Add the 100 microfarads electrolytic capacitor · 50 volts. Its - lead goes into column 23 row C; the highlights show the remaining holes. Connect the servo’s power pin to the positive rail. Connect the servo’s ground pin to the ground rail. Connect the capacitor’s + pin to the positive rail. Connect the capacitor’s - pin to the ground rail. Connect D9 to the orange signal lead. The sketch moves gradually between conservative 30 and 150 degree commands. Stop if the servo binds or buzzes at an end. Check all wiring. Connect the square U S B-B plug to the Uno and the U S B-A plug to your computer. Use Verify and Upload in the code editor below. Use the angle control below to send a position command. Start at ninety degrees, then try sixty and one hundred twenty. The animated horn illustrates commanded movement; a hobby servo does not report its measured angle.
Step 2 — Understand the breadboard
Keep USB disconnected while you build. On this breadboard, each group of five holes shares a connection; the centre channel separates the two halves. You can drag the 3D view to look around.
Loading assembly…
Keep U S B disconnected while you build. On this breadboard, each group of five holes shares a connection; the centre channel separates the two halves. You can drag the 3D view to look around.
Step 3 — Connect Uno 5V → T+ rail 3
Connect the Arduino’s five volt output to the positive rail.
| Connect | To |
|---|---|
| Uno 5V | T+ rail 3 |
Loading assembly…
Connect the Arduino’s five volt output to the positive rail.
Step 4 — Connect Uno GND → T- rail 1
Connect Arduino ground to the ground rail.
| Connect | To |
|---|---|
| Uno GND | T- rail 1 |
Loading assembly…
Connect Arduino ground to the ground rail.
Step 5 — Place Micro servo · positional
Add the Micro servo · positional. Keep its terminals accessible for the connections that follow.
Loading assembly…
Add the Micro servo · positional. Keep its terminals accessible for the connections that follow.
Step 6 — Place 100 µF electrolytic capacitor · 50 V
Add the 100 µF electrolytic capacitor · 50 V. Its - lead goes into column 23 row C; the highlights show the remaining holes.
Exact breadboard holes
- bulk · - → column 23 row C
- bulk · + → column 24 row C
Loading assembly…
Add the 100 microfarads electrolytic capacitor · 50 volts. Its - lead goes into column 23 row C; the highlights show the remaining holes.
Step 7 — Connect Micro servo · positional vcc → T+ rail 29
Connect the servo’s vcc pin to the positive rail.
| Connect | To |
|---|---|
| Micro servo · positional vcc | T+ rail 29 |
Loading assembly…
Connect the servo’s power pin to the positive rail.
Step 8 — Connect Micro servo · positional gnd → T- rail 29
Connect the servo’s gnd pin to the ground rail.
| Connect | To |
|---|---|
| Micro servo · positional gnd | T- rail 29 |
Loading assembly…
Connect the servo’s ground pin to the ground rail.
Step 9 — Connect column 24 row A → T+ rail 23
Connect the capacitor’s + pin to the positive rail.
| Connect | To |
|---|---|
| column 24 row A | T+ rail 23 |
Loading assembly…
Connect the capacitor’s + pin to the positive rail.
Step 10 — Connect column 23 row A → T- rail 23
Connect the capacitor’s - pin to the ground rail.
| Connect | To |
|---|---|
| column 23 row A | T- rail 23 |
Loading assembly…
Connect the capacitor’s - pin to the ground rail.
Step 11 — Connect the servo signal
Connect D9 to the orange signal lead. The sketch moves gradually between conservative 30 and 150 degree commands. Stop if the servo binds or buzzes at an end.
| Connect | To |
|---|---|
| Uno D9 PWM | Micro servo · positional pulse |
Loading assembly…
Connect D9 to the orange signal lead. The sketch moves gradually between conservative 30 and 150 degree commands. Stop if the servo binds or buzzes at an end.
Step 12 — Place USB-A to USB-B cable · Uno
Check all wiring. Connect the square USB-B plug to the Uno and the USB-A plug to your computer. Use Verify and Upload in the code editor below.
Loading assembly…
Check all wiring. Connect the square U S B-B plug to the Uno and the U S B-A plug to your computer. Use Verify and Upload in the code editor below.
Step 13 — Try the servo controls
Use the angle control below to send a position command. Start at ninety degrees, then try sixty and one hundred twenty. The animated horn illustrates commanded movement; a hobby servo does not report its measured angle.
Loading assembly…
Use the angle control below to send a position command. Start at ninety degrees, then try sixty and one hundred twenty. The animated horn illustrates commanded movement; a hobby servo does not report its measured angle.
Step 14 — Program your Uno
Choose Arduino Uno. Verify, pair the board and Upload this sketch. Keep USB connected. Attach a positional servo on D9 and start at 90 degrees. Accept serial commands angle:30 through angle:150 and report the commanded angle every 100 milliseconds.
Step 15 — Control the servo
Use the App slider below, or send angle:60 and angle:120 through Serial Monitor. This is a commanded position; the servo does not report its measured shaft angle.
Step 16 — Troubleshooting
Use one unloaded micro servo with the Uno powered by USB. If it chatters, the board resets or the USB connection drops, disconnect power and use a separate suitable 5V servo supply: move only servo red and the capacitor positive lead onto its separate positive rail, and join its ground to Uno GND. Do not join the two positive supplies. The capacitor helps brief transients; it does not increase available current. Use separate power for loaded or multiple servos. Never feed 9V or a GPIO output into servo power.
Parts List
Required Parts (1)
Use the components named in this tutorial. A computer and any additional power supply are not included.
x1
$64.70
In stockProject Summary
1 part total
Unavailable items will be skipped
