

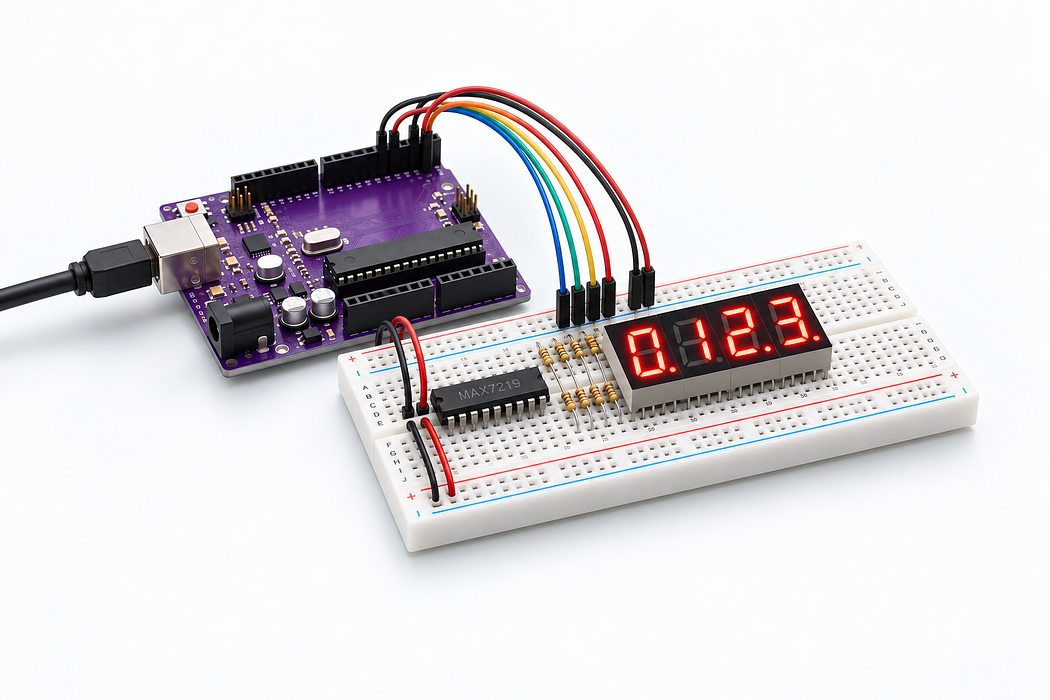
Drive a four-digit display with MAX7219
Use a MAX7219 to multiplex a four-digit common-cathode display. Connect DIN to D11, CLK to D13 and LOAD to D10, and count from 0 to 9999.
Use a MAX7219 to multiplex a four-digit common-cathode display. Connect DIN to D11, CLK to D13 and LOAD to D10, and count from 0 to 9999.
Use the Uno R3 Learning Kit. Build with power disconnected, check the labelled connections, then upload the supplied sketch. Drag or zoom the 3D model to inspect it from any angle.
Identify your part
The listing combines “74hc595 MAX7219 Chip” without clarifying whether both are supplied. This lesson requires the MAX7219 and a confirmed common-cathode 5461AS-style display. Check the chip markings and identify the display pins first.
Also needed
Use an additional full-size 830-contact breadboard for this build. It provides space for the display body, MAX7219 and bypass capacitors; do not crowd these onto the kit’s 400-contact board.
Step 1 — Watch the complete build
Press Play for the narrated build. You can rotate and zoom the model while it plays, or follow the individual steps below.
Loading assembly…
Keep U S B disconnected while you build. On this breadboard, each group of five holes shares a connection; the centre channel separates the two halves. You can drag the 3D view to look around. Connect the Arduino’s five volt output to the positive rail. Connect Arduino ground to the ground rail. Add the MAX7219 L E D display driver. Its 1 · DIN lead goes into E14; the highlights show the remaining holes. Add the Four-digit seven-segment display · 12 pins. Its 1 lead goes into H40; the highlights show the remaining holes. Add the 100 kiloohms resistor. Its Pin 0 lead goes into A27; the highlights show the remaining holes. Add the 100 nanofarads ceramic capacitor. Its 0 lead goes into T+ rail 20; the highlights show the remaining holes. Add the 10 microfarads electrolytic capacitor · 50 volts. Its + lead goes into T+ rail 24; the highlights show the remaining holes. Connect the driver’s supply pin to the positive rail. Connect the driver’s ground pin to the ground rail. Connect the driver’s ground pin to the ground rail. Connect the driver’s ISET pin to one end of the resistor. Connect the other end of the resistor to the positive rail. Connect Arduino digital pin 11 to the driver’s DIN pin. Connect Arduino digital pin 13 to the driver’s clock pin. Connect Arduino digital pin 10 to the driver’s LOAD pin. Connect the driver’s SEG A pin to the display’s 11 pin. Connect the driver’s SEG B pin to the display’s 7 pin. Connect the driver’s SEG C pin to the display’s 4 pin. Connect the driver’s SEG D pin to the display’s 2 pin. Connect the driver’s SEG E pin to the display’s 1 pin. Connect the driver’s SEG F pin to the display’s 10 pin. Connect the driver’s SEG G pin to the display’s 5 pin. Connect the driver's decimal-point segment pin to pin 3 on the display. Connect the driver’s DIG0 pin to the display’s 6 pin. Connect the driver’s DIG1 pin to the display’s 8 pin. Connect the driver’s DIG2 pin to the display’s 9 pin. Connect the driver’s DIG3 pin to the display’s 12 pin. Check all wiring. Connect the square U S B-B plug to the Uno and the U S B-A plug to your computer. Use Verify and Upload in the code editor below.
Step 2 — Understand the breadboard
Keep USB disconnected while you build. On this breadboard, each group of five holes shares a connection; the centre channel separates the two halves. You can drag the 3D view to look around.
Loading assembly…
Keep U S B disconnected while you build. On this breadboard, each group of five holes shares a connection; the centre channel separates the two halves. You can drag the 3D view to look around.
Step 3 — Connect Uno 5V → T+ rail 15
Connect the Arduino’s five volt output to the positive rail.
| Connect | To |
|---|---|
| Uno 5V | T+ rail 15 |
Loading assembly…
Connect the Arduino’s five volt output to the positive rail.
Step 4 — Connect Uno GND → T− rail 11
Connect Arduino ground to the ground rail.
| Connect | To |
|---|---|
| Uno GND | T− rail 11 |
Loading assembly…
Connect Arduino ground to the ground rail.
Step 5 — Place MAX7219 LED display driver
Add the MAX7219 LED display driver. Its 1 · DIN lead goes into E14; the highlights show the remaining holes.
Exact breadboard holes
- driver · 1 · DIN → E14
- driver · 2 · DIG0 → E15
- driver · 3 · DIG4 → E16
- driver · 4 · GND → E17
- driver · 5 · DIG6 → E18
- driver · 6 · DIG2 → E19
- driver · 7 · DIG3 → E20
- driver · 8 · DIG7 → E21
- driver · 9 · GND → E22
- driver · 10 · DIG5 → E23
- driver · 11 · DIG1 → E24
- driver · 12 · LOAD → E25
- driver · 13 · CLK → F25
- driver · 14 · SEG A → F24
- driver · 15 · SEG F → F23
- driver · 16 · SEG B → F22
- driver · 17 · SEG G → F21
- driver · 18 · ISET → F20
- driver · 19 · VCC → F19
- driver · 20 · SEG C → F18
- driver · 21 · SEG E → F17
- driver · 22 · SEG DP → F16
- driver · 23 · SEG D → F15
- driver · 24 · DOUT → F14
Loading assembly…
Add the MAX7219 L E D display driver. Its 1 · DIN lead goes into E14; the highlights show the remaining holes.
Step 6 — Place Four-digit seven-segment display · 12 pins
Add the Four-digit seven-segment display · 12 pins. Its 1 lead goes into H40; the highlights show the remaining holes.
Exact breadboard holes
- display · 1 → H40
- display · 2 → H41
- display · 3 → H42
- display · 4 → H43
- display · 5 → H44
- display · 6 → H45
- display · 7 → D45
- display · 8 → D44
- display · 9 → D43
- display · 10 → D42
- display · 11 → D41
- display · 12 → D40
Loading assembly…
Add the Four-digit seven-segment display · 12 pins. Its 1 lead goes into H40; the highlights show the remaining holes.
Step 7 — Place 100 kΩ resistor
Add the 100 kΩ resistor. Its Pin 0 lead goes into A27; the highlights show the remaining holes.
Exact breadboard holes
- iset · Pin 0 → A27
- iset · Pin 1 → A31
Loading assembly…
Add the 100 kiloohms resistor. Its Pin 0 lead goes into A27; the highlights show the remaining holes.
Step 8 — Place 100 nF ceramic capacitor
Add the 100 nF ceramic capacitor. Its 0 lead goes into T+ rail 20; the highlights show the remaining holes.
Exact breadboard holes
- bypass · 0 → T+ rail 20
- bypass · 1 → T− rail 20
Loading assembly…
Add the 100 nanofarads ceramic capacitor. Its 0 lead goes into T+ rail 20; the highlights show the remaining holes.
Step 9 — Place 10 µF electrolytic capacitor · 50 V
Add the 10 µF electrolytic capacitor · 50 V. Its + lead goes into T+ rail 24; the highlights show the remaining holes.
Exact breadboard holes
- bulk · - → T− rail 24
- bulk · + → T+ rail 24
Loading assembly…
Add the 10 microfarads electrolytic capacitor · 50 volts. Its + lead goes into T+ rail 24; the highlights show the remaining holes.
Step 10 — Connect J19 → T+ rail 14
Connect the driver’s supply pin to the positive rail.
| Connect | To |
|---|---|
| J19 | T+ rail 14 |
Loading assembly…
Connect the driver’s supply pin to the positive rail.
Step 11 — Connect A17 → T− rail 13
Connect the driver’s ground pin to the ground rail.
| Connect | To |
|---|---|
| A17 | T− rail 13 |
Loading assembly…
Connect the driver’s ground pin to the ground rail.
Step 12 — Connect A22 → T− rail 17
Connect the driver’s ground pin to the ground rail.
| Connect | To |
|---|---|
| A22 | T− rail 17 |
Loading assembly…
Connect the driver’s ground pin to the ground rail.
Step 13 — Connect J20 → B27
Connect the driver’s ISET pin to one end of the resistor.
| Connect | To |
|---|---|
| J20 | B27 |
Loading assembly…
Connect the driver’s ISET pin to one end of the resistor.
Step 14 — Connect B31 → T+ rail 26
Connect the other end of the resistor to the positive rail.
| Connect | To |
|---|---|
| B31 | T+ rail 26 |
Loading assembly…
Connect the other end of the resistor to the positive rail.
Step 15 — Connect Uno D11 PWM/MOSI → A14
Connect Arduino digital pin 11 to the driver’s DIN pin.
| Connect | To |
|---|---|
| Uno D11 PWM/MOSI | A14 |
Loading assembly…
Connect Arduino digital pin 11 to the driver’s DIN pin.
Step 16 — Connect Uno D13/SCK → J25
Connect Arduino digital pin 13 to the driver’s CLK pin.
| Connect | To |
|---|---|
| Uno D13/SCK | J25 |
Loading assembly…
Connect Arduino digital pin 13 to the driver’s clock pin.
Step 17 — Connect Uno D10 PWM/SS → A25
Connect Arduino digital pin 10 to the driver’s LOAD pin.
| Connect | To |
|---|---|
| Uno D10 PWM/SS | A25 |
Loading assembly…
Connect Arduino digital pin 10 to the driver’s LOAD pin.
Step 18 — Connect J24 → A41
Connect the driver’s SEG A pin to the display’s 11 pin.
| Connect | To |
|---|---|
| J24 | A41 |
Loading assembly…
Connect the driver’s SEG A pin to the display’s 11 pin.
Step 19 — Connect J22 → A45
Connect the driver’s SEG B pin to the display’s 7 pin.
| Connect | To |
|---|---|
| J22 | A45 |
Loading assembly…
Connect the driver’s SEG B pin to the display’s 7 pin.
Step 20 — Connect J18 → J43
Connect the driver’s SEG C pin to the display’s 4 pin.
| Connect | To |
|---|---|
| J18 | J43 |
Loading assembly…
Connect the driver’s SEG C pin to the display’s 4 pin.
Step 21 — Connect J15 → J41
Connect the driver’s SEG D pin to the display’s 2 pin.
| Connect | To |
|---|---|
| J15 | J41 |
Loading assembly…
Connect the driver’s SEG D pin to the display’s 2 pin.
Step 22 — Connect J17 → J40
Connect the driver’s SEG E pin to the display’s 1 pin.
| Connect | To |
|---|---|
| J17 | J40 |
Loading assembly…
Connect the driver’s SEG E pin to the display’s 1 pin.
Step 23 — Connect J23 → A42
Connect the driver’s SEG F pin to the display’s 10 pin.
| Connect | To |
|---|---|
| J23 | A42 |
Loading assembly…
Connect the driver’s SEG F pin to the display’s 10 pin.
Step 24 — Connect J21 → J44
Connect the driver’s SEG G pin to the display’s 5 pin.
| Connect | To |
|---|---|
| J21 | J44 |
Loading assembly…
Connect the driver’s SEG G pin to the display’s 5 pin.
Step 25 — Connect J16 → J42
Connect the driver’s SEG DP pin to the display’s 3 pin.
| Connect | To |
|---|---|
| J16 | J42 |
Loading assembly…
Connect the driver's decimal-point segment pin to pin 3 on the display.
Step 26 — Connect A15 → J45
Connect the driver’s DIG0 pin to the display’s 6 pin.
| Connect | To |
|---|---|
| A15 | J45 |
Loading assembly…
Connect the driver’s DIG0 pin to the display’s 6 pin.
Step 27 — Connect A24 → A44
Connect the driver’s DIG1 pin to the display’s 8 pin.
| Connect | To |
|---|---|
| A24 | A44 |
Loading assembly…
Connect the driver’s DIG1 pin to the display’s 8 pin.
Step 28 — Connect A19 → A43
Connect the driver’s DIG2 pin to the display’s 9 pin.
| Connect | To |
|---|---|
| A19 | A43 |
Loading assembly…
Connect the driver’s DIG2 pin to the display’s 9 pin.
Step 29 — Connect A20 → A40
Connect the driver’s DIG3 pin to the display’s 12 pin.
| Connect | To |
|---|---|
| A20 | A40 |
Loading assembly…
Connect the driver’s DIG3 pin to the display’s 12 pin.
Step 30 — Place USB-A to USB-B cable · Uno
Check all wiring. Connect the square USB-B plug to the Uno and the USB-A plug to your computer. Use Verify and Upload in the code editor below.
Loading assembly…
Check all wiring. Connect the square U S B-B plug to the Uno and the U S B-A plug to your computer. Use Verify and Upload in the code editor below.
Step 31 — Program your Uno
Choose Arduino Uno. Verify, pair the board and Upload this sketch. Keep USB connected. Use a MAX7219 to multiplex a four-digit common-cathode display. Connect DIN to D11, CLK to D13 and LOAD to D10, and count from 0 to 9999.
Step 32 — Try it and troubleshoot
The display counts in decimal. In the targeted 5461AS-style map, digits left-to-right are pins 12, 9, 8, 6. Segments A–G and DP are pins 11, 7, 4, 2, 1, 10, 5, 3. Confirm your package first.
If it does not work
A four-digit bare display is not a TM1637 module. If your display is common-anode or has another pin map, do not use this wiring unchanged.
Parts List
Required Parts (2)
Use the components named in this tutorial. A computer and any additional power supply are not included.
x1
$64.70
In stock
Use this larger board in place of the kit’s 400-contact breadboard, to keep component bodies and jumper connections clear.
x1
$8.90
In stockProject Summary
2 parts total
Unavailable items will be skipped
