
Beginner
Ultrasonic Rangefinder with Arduino
Find out how to use an Ultrasonic Rangefinder for proximity sensing
By Cherie Tan
An ultrasonic distance sensor measures distance by using ultrasonic waves, and so it can be used for proximity sensing.
In this guide, you will learn to use an ultrasonic distance sensor with a 100% Arduino-compatible board.
In this guide, you will learn to use an ultrasonic distance sensor with a 100% Arduino-compatible board.
After completing this guide, you will gain a basic understanding on how to use an ultrasonic distance sensor and incorporate it into your next Arduino projects.
Connect Arduino 5V to the Ultrasonic Range Finder.
Step 1 — Connect Arduino 5V to the Ultrasonic Range Finder

Connect Arduino 5V to the Ultrasonic Range Finder.
Step 2 — Connect Arduino Digital 12 to Trig Pin
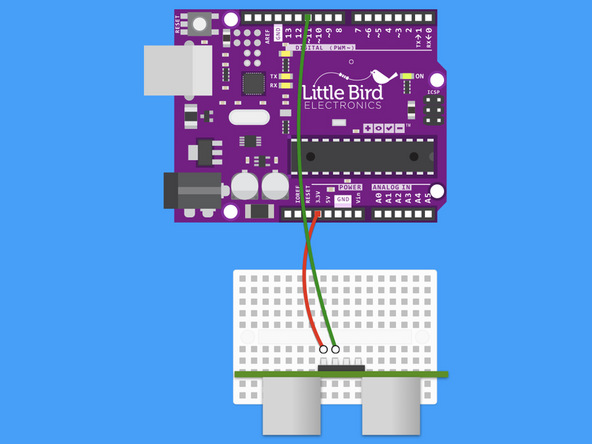
Connect Arduino Digital 12 to the Ultrasonic Range Finder's Trig Pin.
Step 3 — Connect Arduino Digital 11 to Echo Pin

Connect Arduino Digital 11 to the Ultrasonic Range Finder's Echo Pin.
Step 4 — Connect Arduino GND to the GND
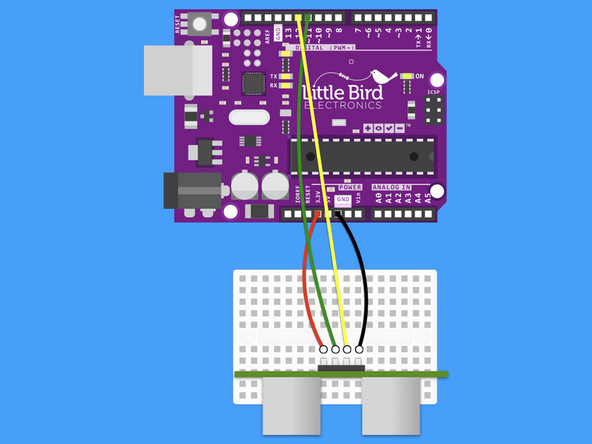
Connect Arduino GND to the Ultrasonic Range Finder's GND.
Step 5 — Measure the distance
// defines pins numbers
const int trigPin = 11;
const int echoPin = 12;

// defines variables
long duration;
int distance;

void setup() {
  pinMode(trigPin, OUTPUT); // Make the trigPin an OUTPUT
  pinMode(echoPin, INPUT); // Make the echoPin an INPUT
  Serial.begin(9600); // Setup the Serial Port
}

void loop() {

  // Clear the trigPin
  digitalWrite(trigPin, LOW);
  delayMicroseconds(2);

  // Send a pulse by setting the trigPin Higj for 10 Micro seconds
  digitalWrite(trigPin, HIGH);
  delayMicroseconds(10);
  digitalWrite(trigPin, LOW);

  // Read the length of time for the sound wave to return
  duration = pulseIn(echoPin, HIGH);

  // Calculating the total distance from the object
  distance = duration * 0.034 / 2;

  // Prints the distance to the Serial Port
  Serial.print("The Distance Is: ");
  Serial.println(distance);
}
This code will measure the distance from an object and print out the value to your Serial Monitor.
Copy and paste the code into your Arduino Software.
Upload the code to your Arduino.
Set your Serial Monitor at a Baud of 9600.
Parts List
Optional Extras (2)

Project Summary
2 parts total
Required parts
$0.00
Optional extras
+$23.60
Total (required)
$0.00
Unavailable items will be skipped
