
Intermediate
0.96'' OLED Screen with micro:bit
Learn to show images on the screen
By Cherie Tan
The micro:bit has 25 programmable LEDs in a 5x5 matrix, which allows you to display text, numbers and images. But what if you wanted to use a different screen altogether?
In this guide, we will use a 0.96'' OLED display screen with the micro:bit. We will be using the MU editor to program the micro:bit using MicroPython. Alternatively, the micro:bit can also be programmed using the MakeCode editor. Sample code is provided at the end of the tutorial.
Finishing this guide will mean you have not only programmed in MicroPython, but you are one step closer to using the OLED display in your own micro:bit projects!
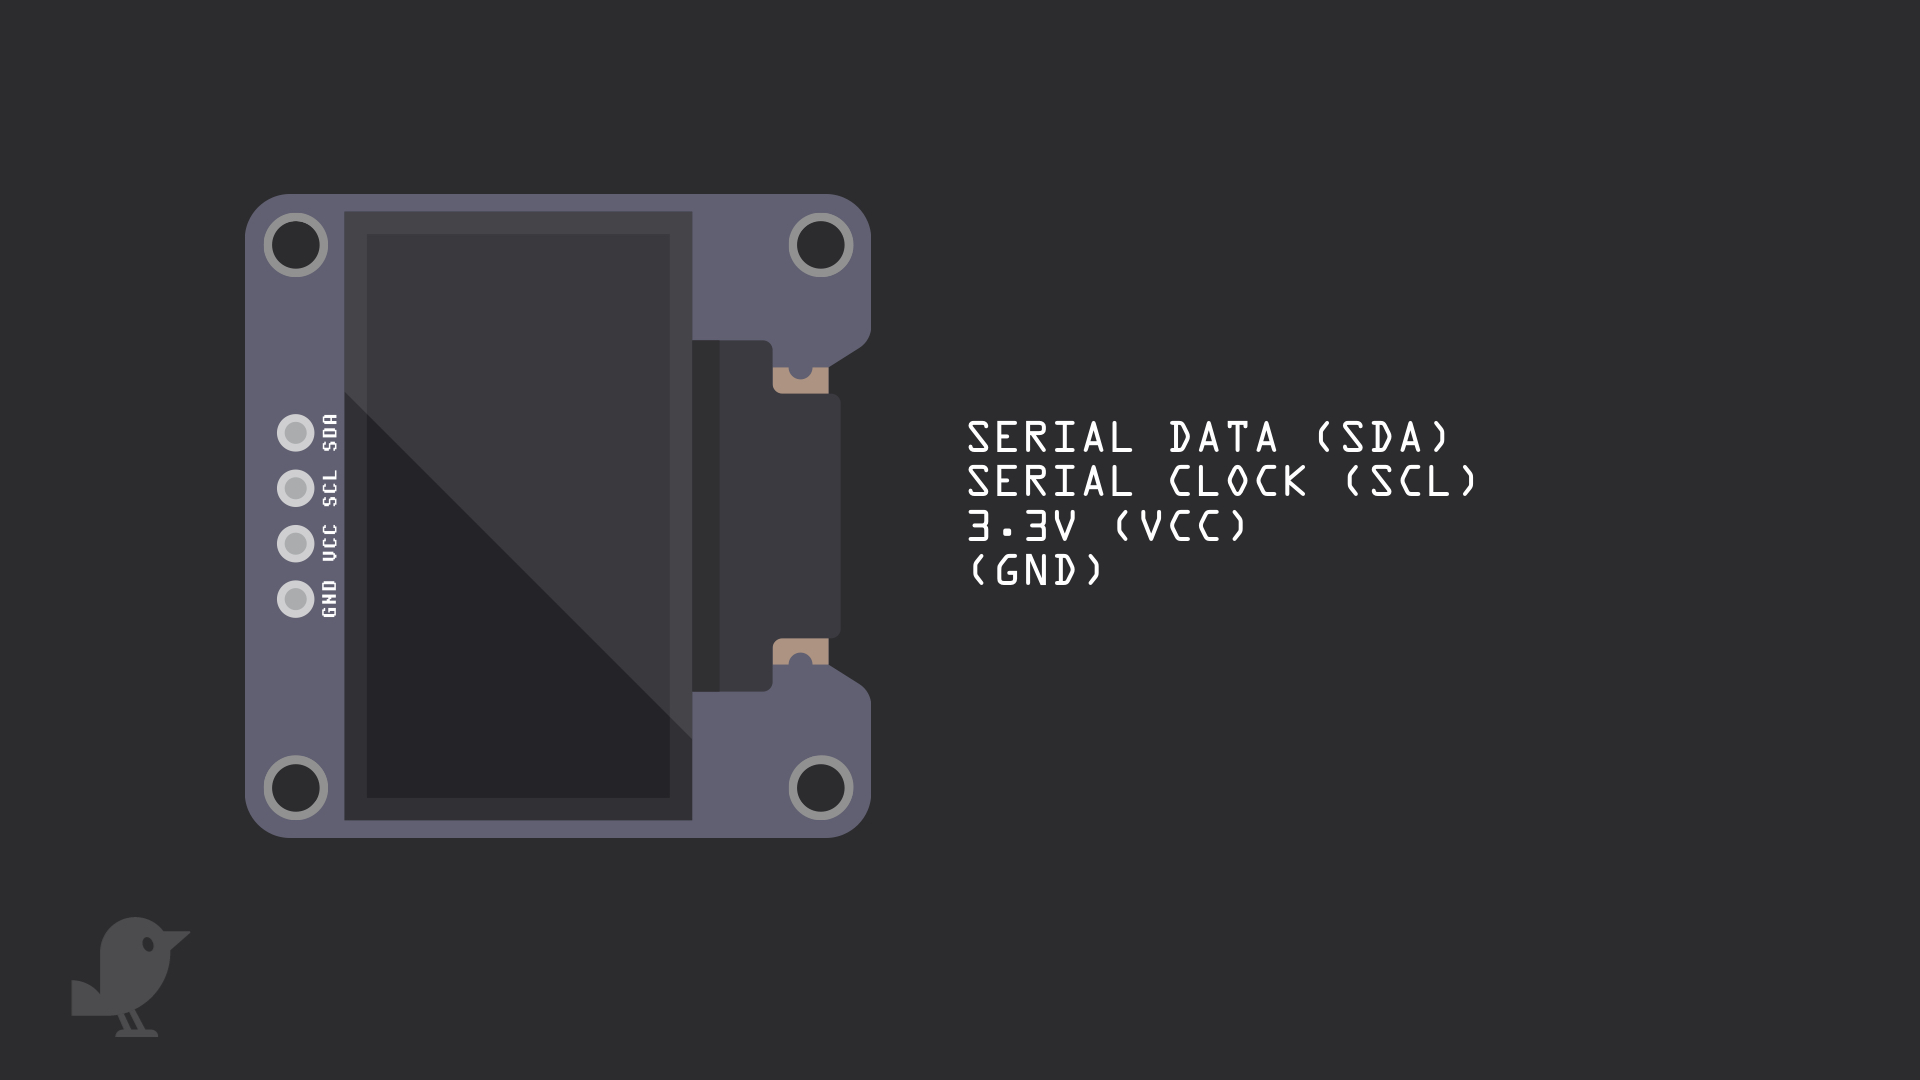
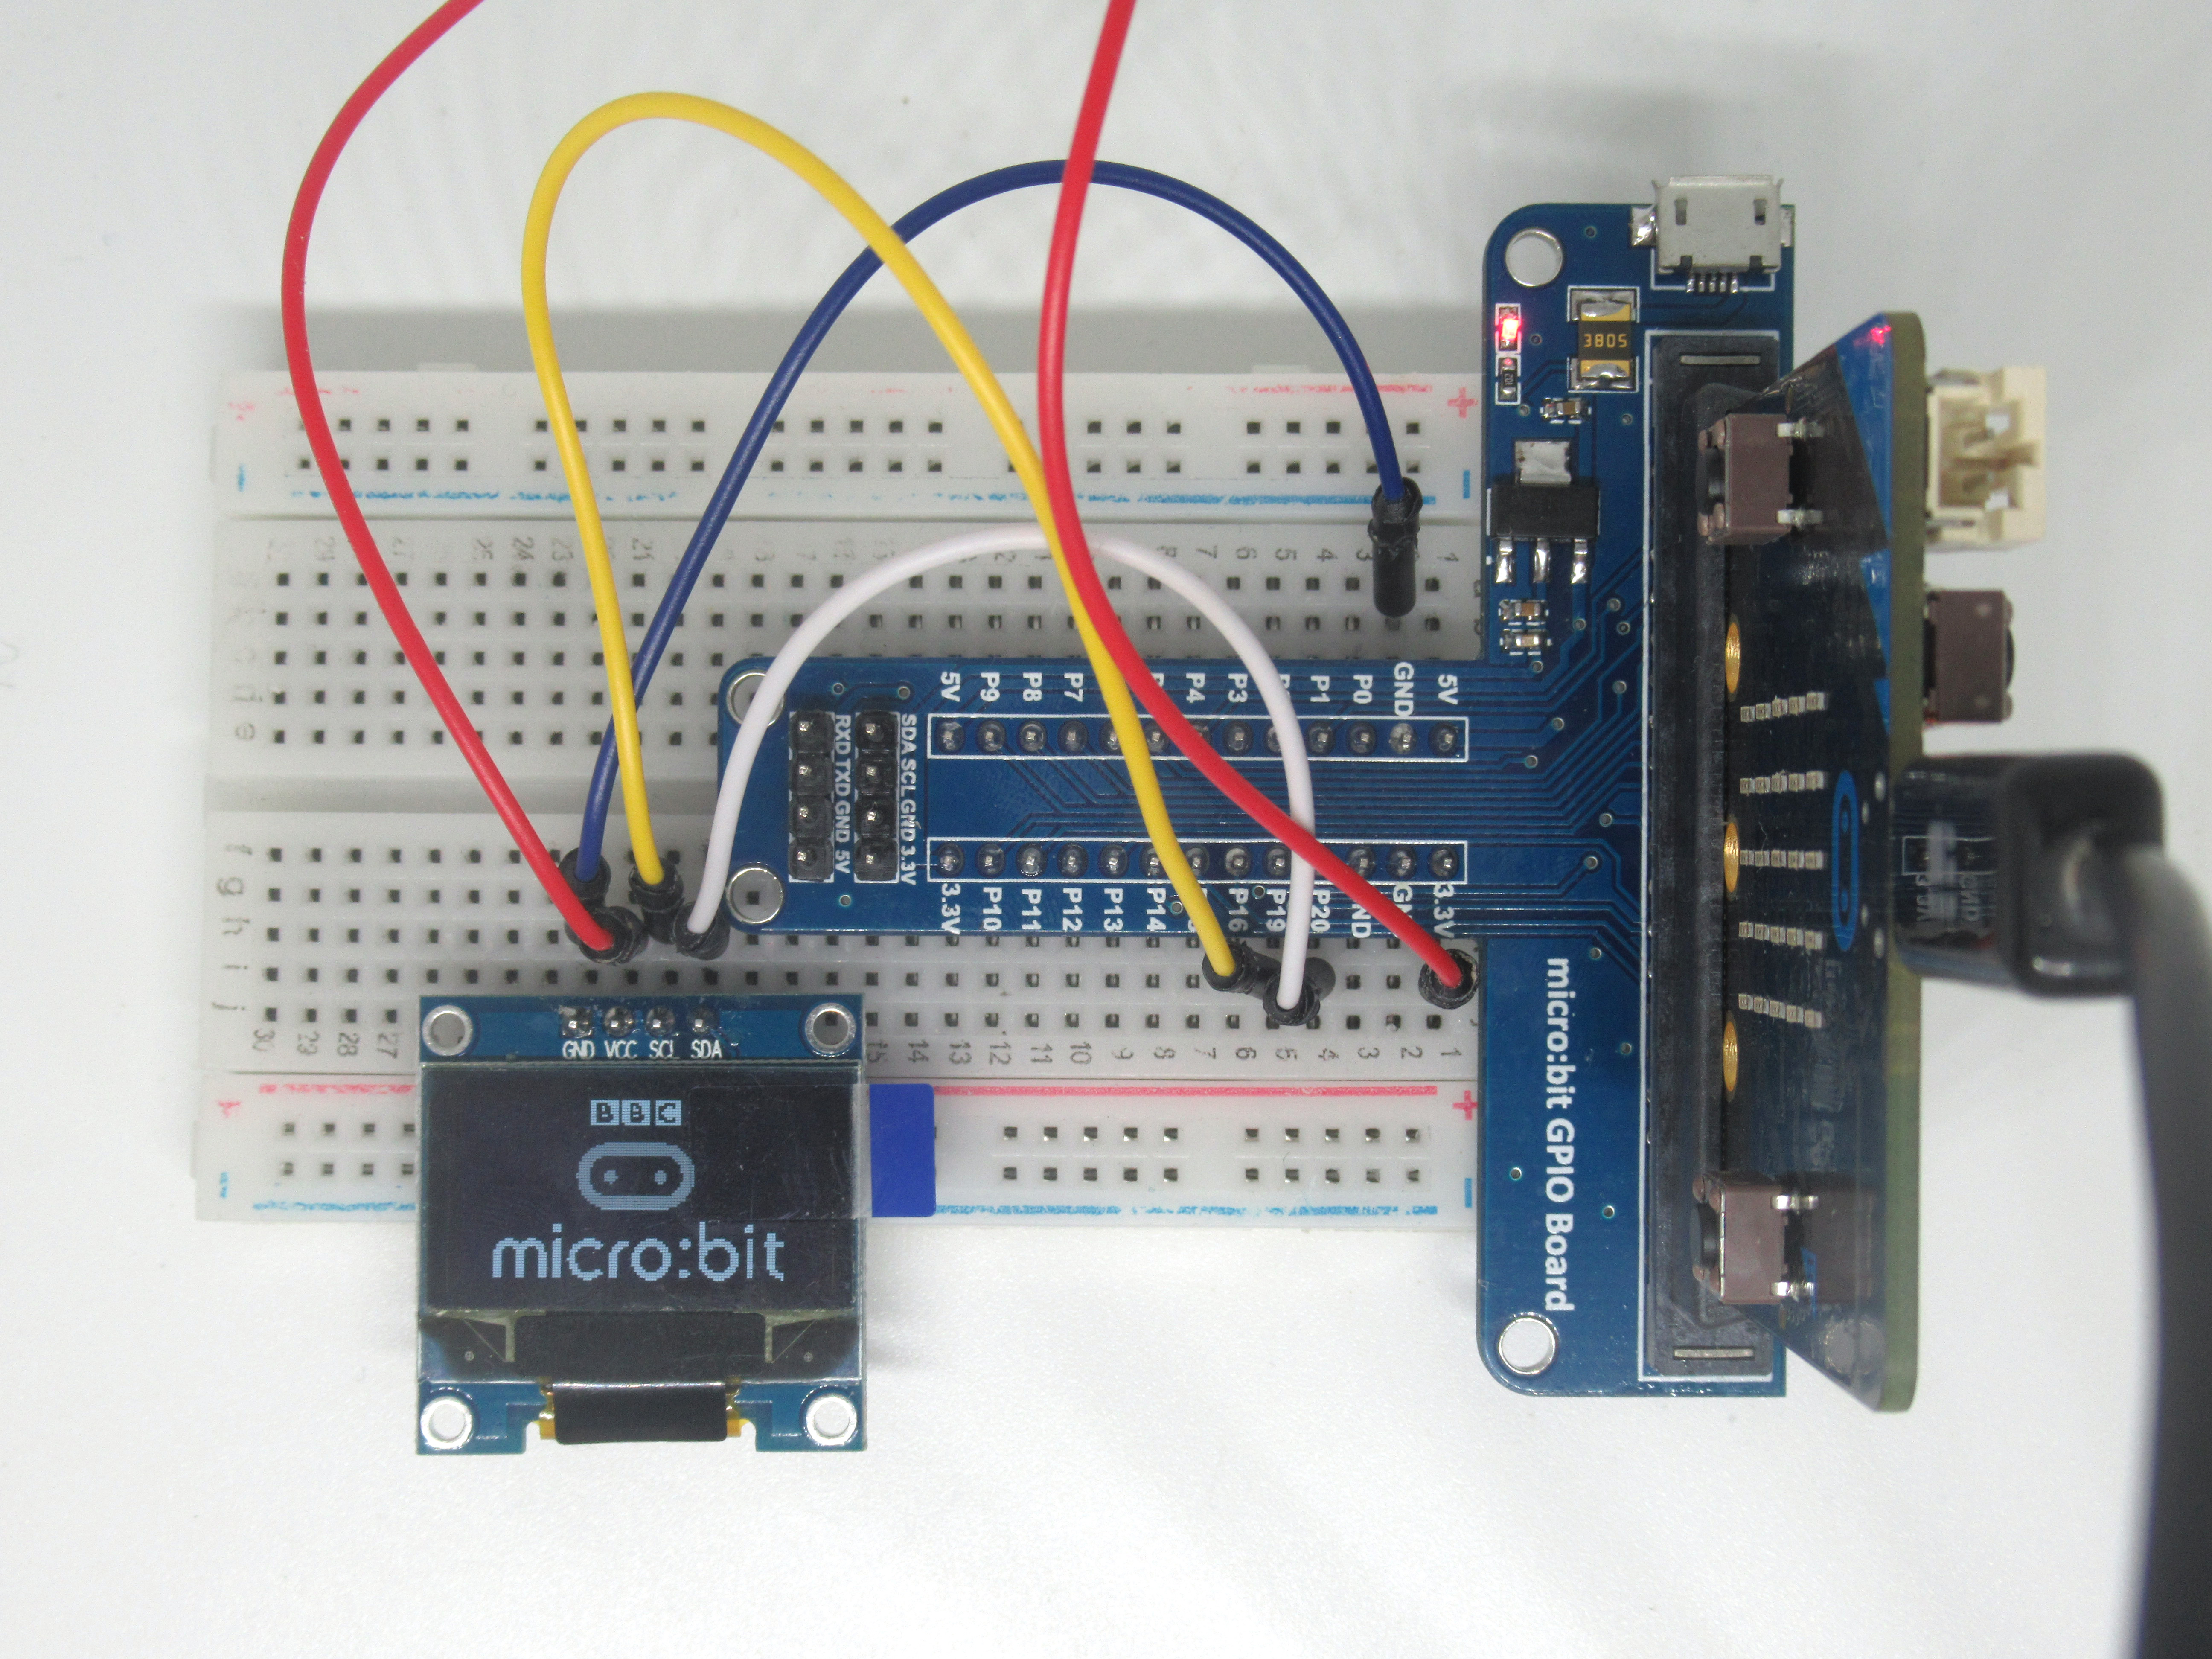
Let's take a closer look at the 0.96'' OLED module. It has four pins:
GND: In electronics, we define a point in a circuit to be a kind of zero volts or 0V reference point, on which to base all other voltage measurements. This point is called common ground or GND.
3.3V : While 'VCC' stands for Voltage Common Collector, we'll connect the VCC pin to 3.3V on the micro:bit
Serial Clock (SCL)
Serial Data (SDA)
Voltage is the difference in electric potential between two points. As it is difficult to talk about voltage without a reference point, we need another point to compare it to.
To connect the SCL and SDA pins to the micro:bit, they must be connected to Pins 19 and 20. This is because pins 19 and 20 on the Micro:bit are what we call the default I2C SCL and SDA pins. I2C stands for inter-integrated circuit protocol, and it allows for devices to communicate with one another.
Step 1 — The Module
Let's take a closer look at the 0.96'' OLED module. It has four pins:
GND: In electronics, we define a point in a circuit to be a kind of zero volts or 0V reference point, on which to base all other voltage measurements. This point is called common ground or GND.
3.3V : While 'VCC' stands for Voltage Common Collector, we'll connect the VCC pin to 3.3V on the micro:bit
Serial Clock (SCL)
Serial Data (SDA)
GND: In electronics, we define a point in a circuit to be a kind of zero volts or 0V reference point, on which to base all other voltage measurements. This point is called common ground or GND.
3.3V : While 'VCC' stands for Voltage Common Collector, we'll connect the VCC pin to 3.3V on the micro:bit
Serial Clock (SCL)
Serial Data (SDA)
Voltage is the difference in electric potential between two points. As it is difficult to talk about voltage without a reference point, we need another point to compare it to.
To connect the SCL and SDA pins to the micro:bit, they must be connected to Pins 19 and 20. This is because pins 19 and 20 on the Micro:bit are what we call the default I2C SCL and SDA pins. I2C stands for inter-integrated circuit protocol, and it allows for devices to communicate with one another.
Step 2 — Connect module to breadboard
Step 3 — Connect 3.3V to VCC
Step 4 — Connect P19 to SCL
Step 5 — Connect GND to GND
Step 6 — Connect P20 to SDA
Step 7 — MakeCode
OLED.init(64, 128)
OLED.showStringNoNewLine("Hello, OLED!")
OLED.nextLine()
OLED.showNumberWithNewLine(100)
OLED.nextLine()
We can program the 0.96'' OLED screen using the MakeCode editor, or MU Editor.
If you prefer to use the MakeCode editor with the OLED, add the following code to the Javascript interface.
If you prefer to use the MakeCode editor with the OLED, add the following code to the Javascript interface.
This MakeCode uses the oled-ssd1306 MakeCode package, which comes with a few useful functions that will let you:
- Show a string
- Create a new line
- Show a number
- Draw a filled box with coordinates
- Draw circles with coordinates
- Clear the display and much more!
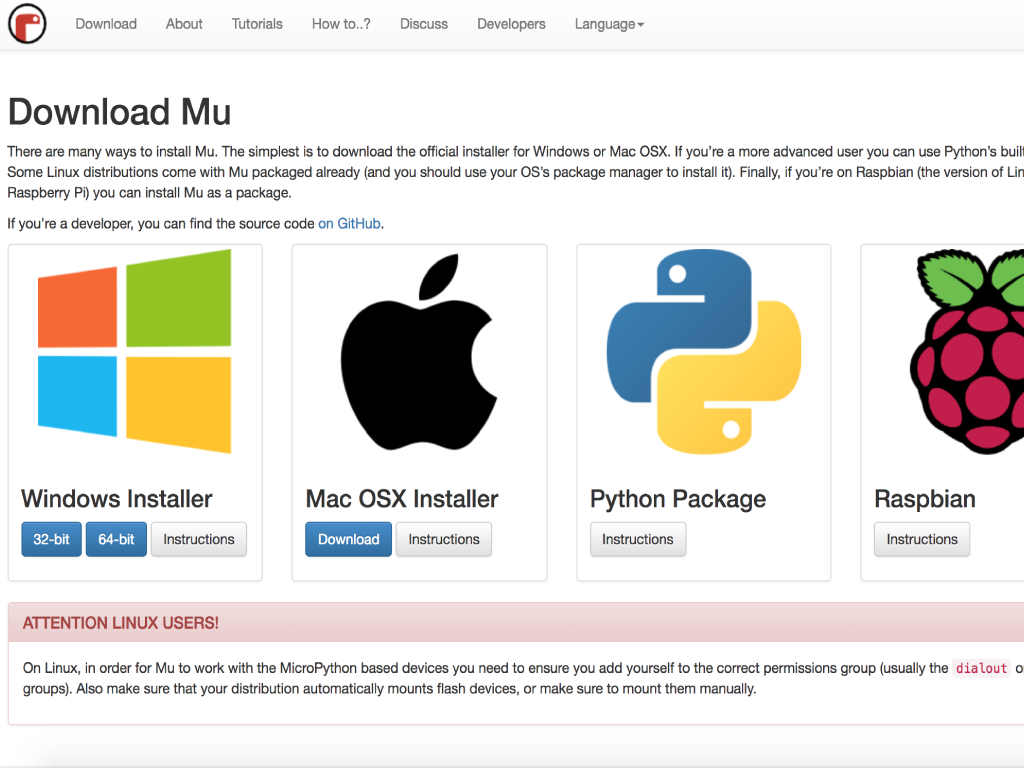
Step 8 — MU Editor
Start the editor! Double-click on mu editor. A folder on your computer called mu_code will be created.
To program the OLED display with the micro:bit using Micropython, you will need to have downloaded and installed MU Editor. Head over to Code With Mu download page
Choose the installer for your operating system. In this guide, we are using a MacOSX Installer.
If you are using Windows but unsure if it is 32-bit or 64-bit ...
- Press the Windows key
- Type into search "System information".
- Look at what it says in 'System Type'.
Double-click on the downloaded file, 'mu-editor_1.0_osx.dmg'. If you are using Windows, it will be a different file.
Drag and drop the mu editor into 'Applications' folder. If you are using Windows, run the installer.
Step 9 — Download the library
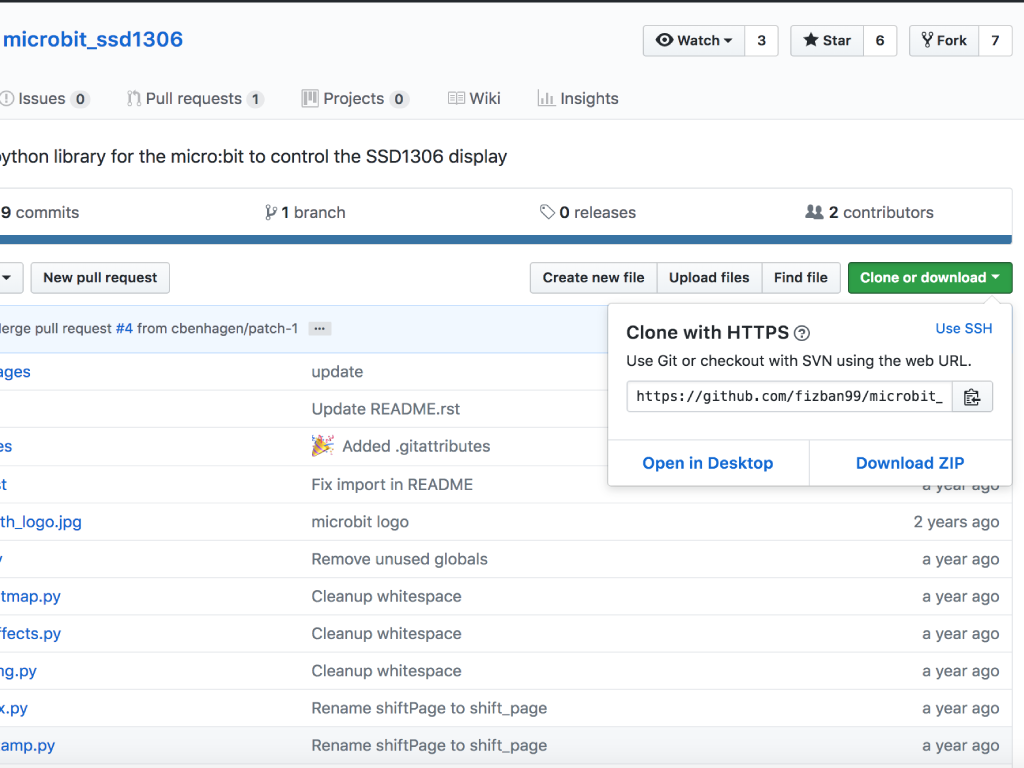
Before we can use the OLED display with MicroPython, we will need the correct libraries for it.
Go to the microbit_ssd1306 github page
Click on 'Clone or download' button.
Choose 'Download ZIP'
Step 10 — Move ssd1306 library files
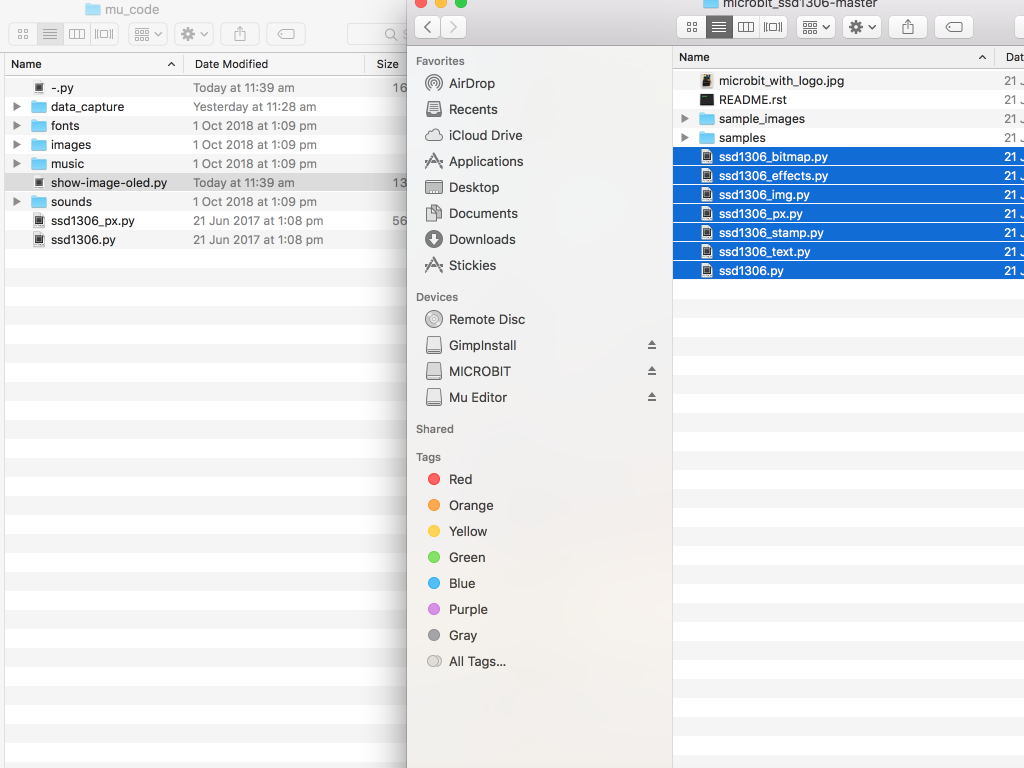
Now we will need to move the library files into the mu editor folder, this is so that you can find them in the mu editor. Open up the mu_code folder.
Open the microbit_ssd1306-master folder
Copy and paste all the python files into the mu_code folder
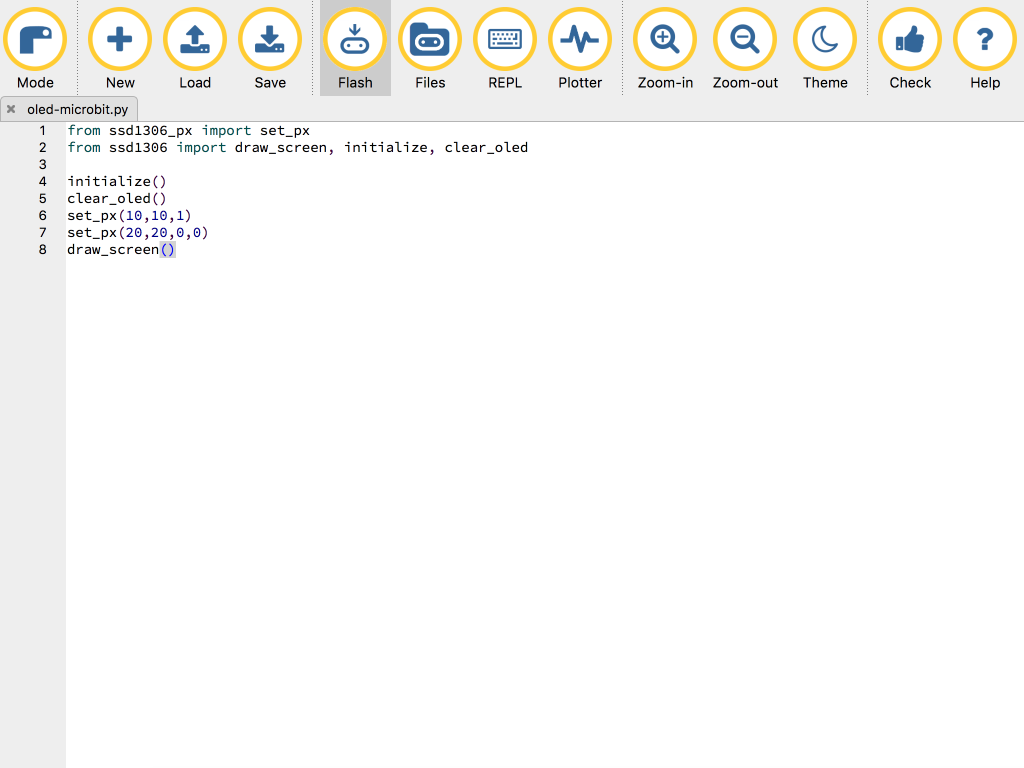
Step 11 — The code
from ssd1306_px import set_px
from ssd1306 import draw_screen, initialize, clear_oled

initialize()
clear_oled()
set_px(10,10,1)
set_px(20,20,0,0)
draw_screen()
Let's start with something simple so you can get familiar with programming the OLED display.
Step 12 — Flash the code to the micro:bit
Drag and drop the ssd1306_px.py and ssd1306.py files from "Files on your computer" over to 'Files on your micro:bit"
Press the reset button on your micro:bit. The micro:bit will now display a tiny white pixel on the screen.
If there are no files listed under 'Files on your computer', please go back to step 4 and make sure that the files in 'microbit_ssd1306' have been copied and pasted into the 'mu_code' folder.
Click on 'Flash' to upload the code to the micro:bit
You will be greeted with an error message stating that the required libraries cannot be found. This is because we haven't yet uploaded the library files to the micro:bit!
Click on 'Files' button
Step 13 — Prepare a bitmap image
We will use a sample image provided in the ssd1306 library
If you would like to create your own bitmap image, remember it needs to use only 2 bits per pixel (black and white)
We need to convert the bitmap image to its hex data. Use LCDAssistant (Windows) or bitmapToC (MacOSX) to generate the hex data
Copy the hex data into the bitmap_converter.py file in the sample_images folder
Run bitmap_converter.py on a computer with Python.
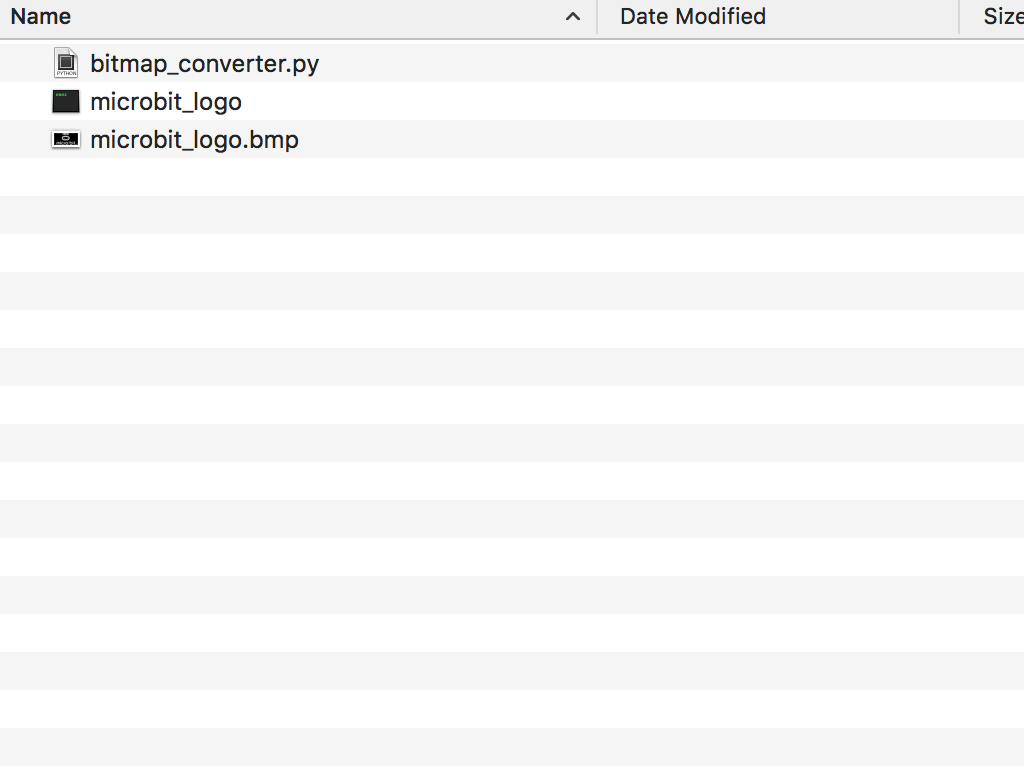
Step 14 — Add generated file to mu_code folder
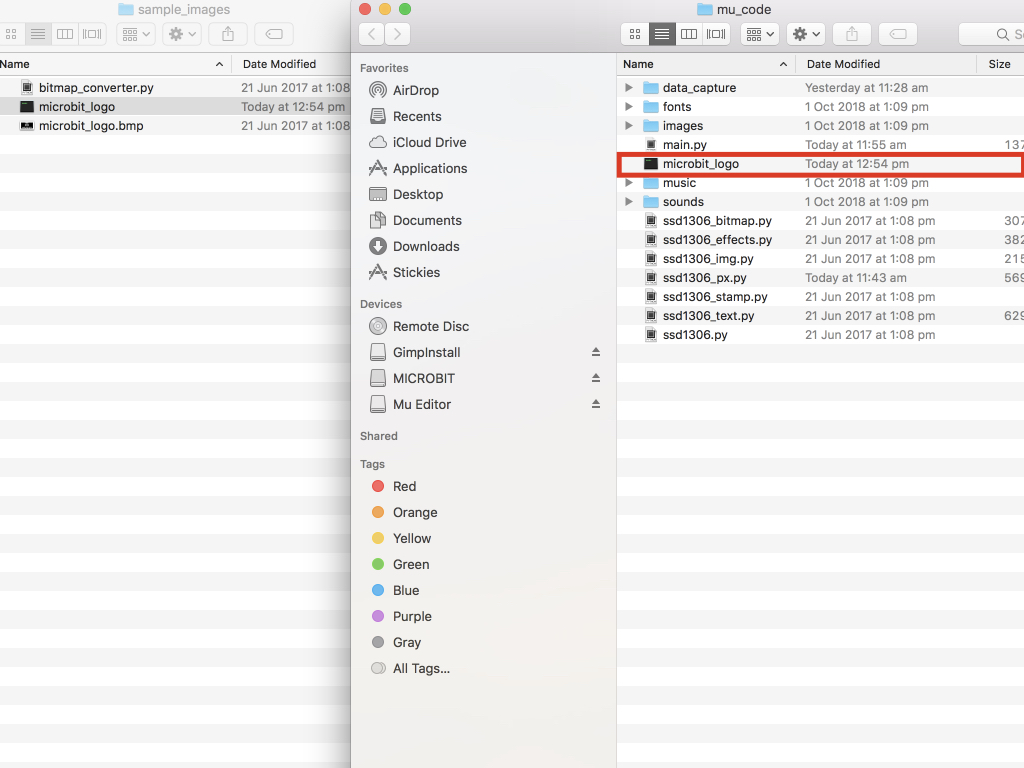
After you have ran the file, it should have generated a microbit_logo file.
We will need to move it to mu_code folder so you can find it in mu editor.
Drag and drop microbit_logo into the mu_code folder.
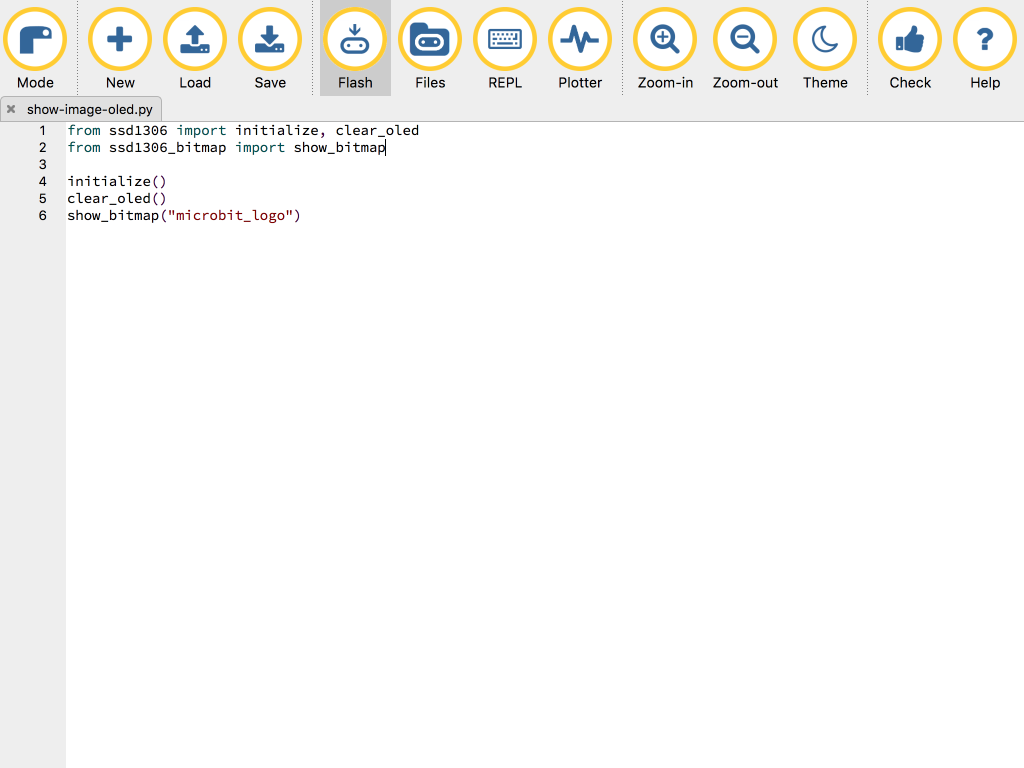
Step 15 — The code to show bitmap image
from ssd1306 import initialize, clear_oled
from ssd1306_bitmap import show_bitmap

initialize()
clear_oled()
show_bitmap("microbit_logo")
With the bitmap image prepared, we can move on to programming the micro:bit. Replace the existing code with the following.
Step 16 — Flash the code to the micro:bit
Open up an empty file in mu and add the code in the previous step to it. Name the file 'main.py'
Click on 'Flash' button.
Add the libraries. Move the files main.py, ssd1306.py and ssd1306_bitmap.py over to the micro:bit
Add the microbit_logo file by dragging it from "Files on your computer" over to "files on your micro:bit"
Press the reset button on the micro:bit. If everything is successfully done, you will see the micro:bit logo displayed on the OLED display!
Step 17 — Complete
Power up the micro:bit via a microUSB cable. If everything is successfully done, you will see the micro:bit logo displayed on the OLED display.
Parts List
Required Parts (3)

Project Summary
3 parts total
Required parts
$237.75
Total (required)
$237.75
Unavailable items will be skipped
