
Beginner
4-Digit Counter with micro:bit
Learn to use a 4 digit display with micro:bit
By Cherie Tan
Besides having the onboard LED display on the micro:bit, you can also add an external display to it.
In this guide, we will use the micro:bit and an external 4 digit display to create a counter. We will use the TMP1637 package in the MakeCode editor to do this.
After completing this guide, you will have gained a basic understanding of how to use a 4 digit display module with the micro:bit.
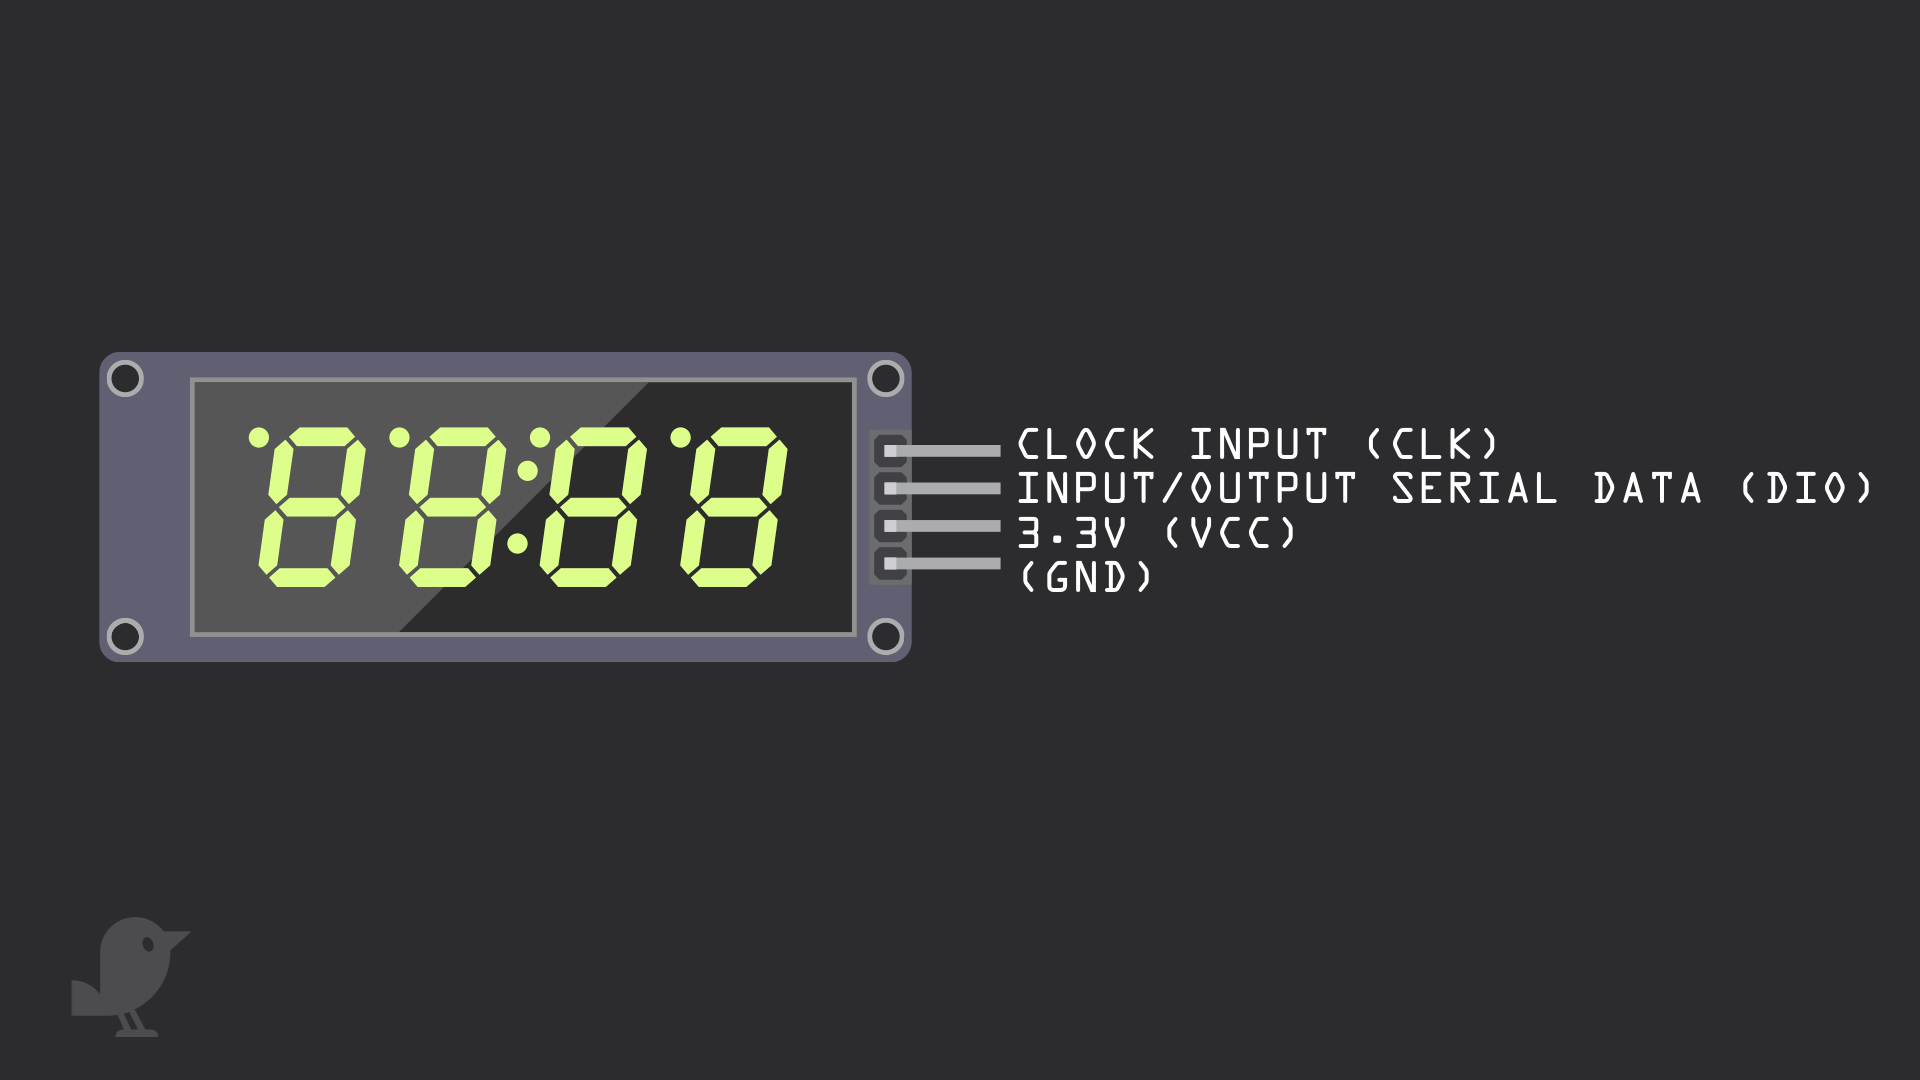
Before we begin, let's take a closer look at the 4-Digit LED Module! There are four pins:
Clock Input (CLK)
Input/Output Serial Data (DIO)
3.3V : 'VCC' stands for Voltage Common Collector, we'll connect the VCC pin to 3.3V on the micro:bit
GND: In electronics, we define a point in a circuit to be a kind of zero volts or 0V reference point, on which to base all other voltage measurements. This point is called ground or GND.
Voltage is the difference in potential between two points. As it is difficult to talk about voltage without a reference point, we need another point to compare it to.
Step 1 — The Module
Before we begin, let's take a closer look at the 4-Digit LED Module! There are four pins:
Clock Input (CLK)
Input/Output Serial Data (DIO)
3.3V : 'VCC' stands for Voltage Common Collector, we'll connect the VCC pin to 3.3V on the micro:bit
GND: In electronics, we define a point in a circuit to be a kind of zero volts or 0V reference point, on which to base all other voltage measurements. This point is called ground or GND.
Clock Input (CLK)
Input/Output Serial Data (DIO)
3.3V : 'VCC' stands for Voltage Common Collector, we'll connect the VCC pin to 3.3V on the micro:bit
GND: In electronics, we define a point in a circuit to be a kind of zero volts or 0V reference point, on which to base all other voltage measurements. This point is called ground or GND.
Voltage is the difference in potential between two points. As it is difficult to talk about voltage without a reference point, we need another point to compare it to.
Step 2 — Connect module to breadboard
Step 3 — Connect GND to GND
Step 4 — Connect 3.3V to VCC
Step 5 — Connect P2 to DIO
Step 6 — Connect P1 to CLK
Step 7 — Add the extension
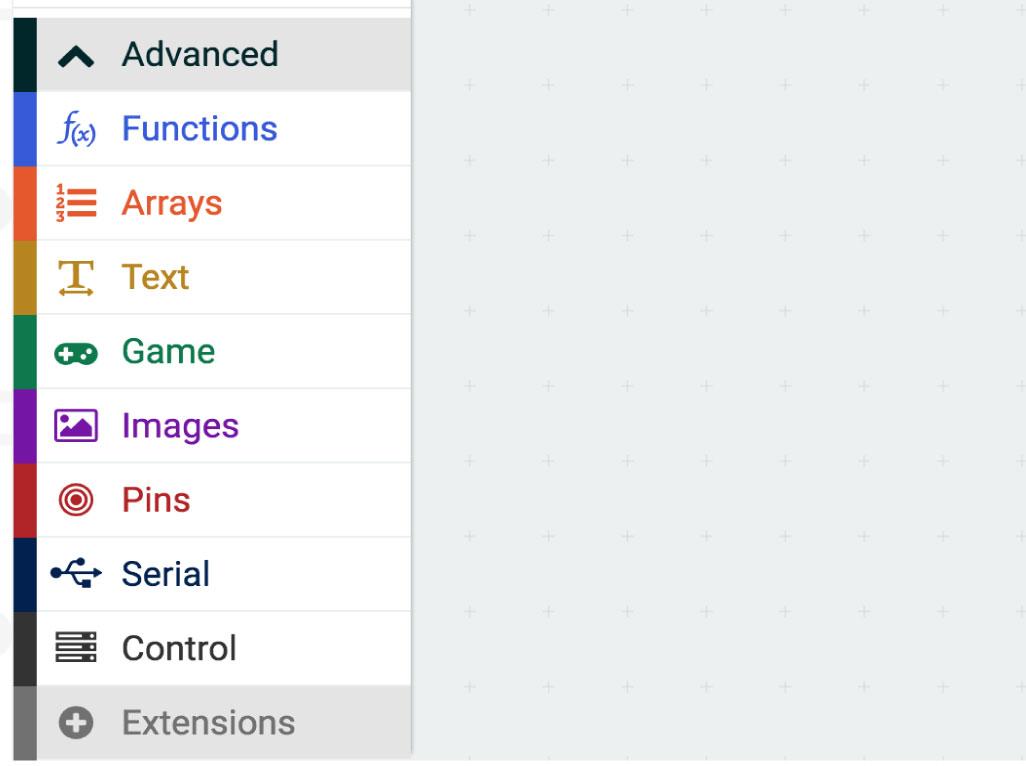
It's now time to work on the code! For this module, we will need to add an extension or package. First, open up the MakeCode editor and start a new project
Click on Advanced > Extensions
In the search box, paste or type : TM1637
Click on the TM1637 package and it will be added to the MakeCode Editor
Step 8 — Create 'on start' code
let tm: TM1637.TM1637LEDs = null
let item = 0
item = 0
tm = TM1637.create(
DigitalPin.P1,
DigitalPin.P2,
7,
4
)
Add this code to the Javascript interface in Makecode editor.
Step 9 — The counter
let tm: TM1637.TM1637LEDs = null
let item = 0
item = 0
tm = TM1637.create(
DigitalPin.P1,
DigitalPin.P2,
7,
4
)
basic.forever(function () {
    tm.showNumber(item)
    item += 1
    basic.pause(1000)
})
Replace the previous code with this in the Javascript interface.
Step 10 — Turn the counter on
let tm: TM1637.TM1637LEDs = null
let item = 0
input.onButtonPressed(Button.AB, function () {
    item = 0
})
input.onButtonPressed(Button.B, function () {
    tm.off()
})
input.onButtonPressed(Button.A, function () {
    tm.on()
})
item = 0
tm = TM1637.create(
DigitalPin.P1,
DigitalPin.P2,
7,
4
)
basic.forever(function () {
    tm.showNumber(item)
    item += 1
    basic.pause(1000)
})
With the previous code, you could turn the counter off as well as reset it. But what about turning it on? Replace the code with this in the Javascript interface.
Step 11 — Turn the counter off
let tm: TM1637.TM1637LEDs = null
let item = 0
input.onButtonPressed(Button.AB, function () {
    item = 0
})
input.onButtonPressed(Button.B, function () {
    tm.off()
})
item = 0
tm = TM1637.create(
DigitalPin.P1,
DigitalPin.P2,
7,
4
)
basic.forever(function () {
    tm.showNumber(item)
    item += 1
    basic.pause(1000)
})
Next, let's make it so that when button B is pressed, the counter turns off. Replace the code with this.
Step 12 — Reset the counter
let tm: TM1637.TM1637LEDs = null
let item = 0
input.onButtonPressed(Button.AB, function () {
    item = 0
})
item = 0
tm = TM1637.create(
DigitalPin.P1,
DigitalPin.P2,
7,
4
)
basic.forever(function () {
    tm.showNumber(item)
    item += 1
    basic.pause(1000)
})
Let's add a reset button to the counter. We will use a button on the micro:bit to do this. Replace the code in the Javascript interface with this code.
Step 13 — Upload the code
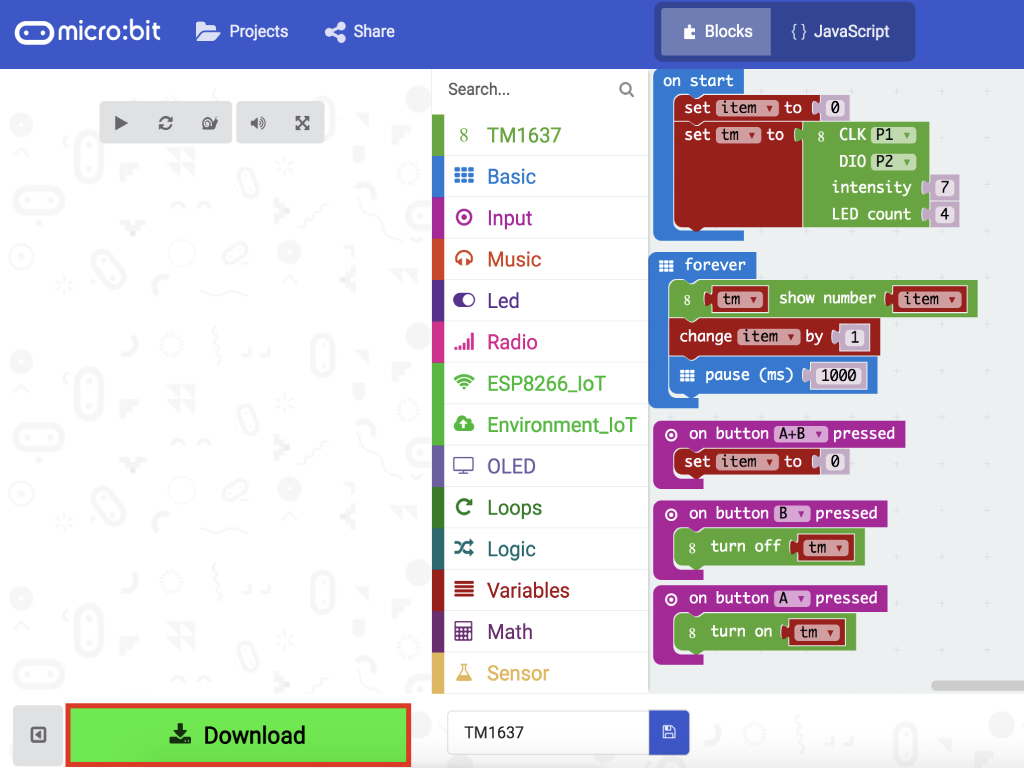
Finally, it's time to upload the code onto your micro:bit! Connect the micro:bit to your computer using a microUSB cable
In MakeCode editor, click on the Download button on the bottom left-hand corner
Find the hex file in your Downloads folder or where you have saved it to
Open up Finder on the MacOS or Explorer on Windows, and drag the hex file into MICROBIT under 'Devices' on the macOS.
The micro:bit will flash for a few seconds and then you will see the counter display start up. Congratulations you have made your first mirco:bit counter. In summary, you can start the timer by pressing 'A', stop the timer from counting by pressing 'B' and finally reset it by pressing 'A+B' at the same time.
Parts List
Required Parts (3)

Project Summary
3 parts total
Required parts
$237.75
Total (required)
$237.75
Unavailable items will be skipped
