
Intermediate
Ultrasonic Distance Sensor with micro:bit
Learn to use an ultrasonic distance sensor, and even move around obstacles with the Bird Bot
By Cherie Tan
The ultrasonic distance sensor adds distance awareness to your project.
Most mobile robots can also avoid obstacles! The Bird Bot uses an ultrasonic distance sensor, to avoid obstacles. This kind of system can be found used in autonomous cars, and in robots built for all sorts of tournaments.
In this guide, you will first learn to connect the ultrasonic distance sensor to the micro:bit. If you've got the bird bot or maqueen lying around, you can also choose to create an obstacle avoidance robotl Learn to add an obstacle avoidance functionality to the Bird Bot with Microsoft MakeCode.
Complete this guide to learn how to take your micro:bit on to the next level, setting you on your way to build bigger and better autonomous projects!
The ultrasonic distance sensor measures distance by using ultrasonic waves, and so it can be used for proximity sensing. It has four pins: VCC, Trig, Echo, and Ground.
If you've got the maqueen or bird bot as well, you can tackle the second part of this guide, where we'll show you how to add obstacle avoidance functionality to your robot. This kind of system can be found used in autonomous cars, and in robots built for all sorts of tournaments.
In this guide, learn how to connect the ultrasonic distance sensor to the micro:bit, and program it to detect the distance from an object. In the second part, learn to create an obstacle avoiding robot with the Bird Bot and Microsoft MakeCode. These first steps will set you on your way to build bigger and better autonomous projects!
Step 1 — Overview
The ultrasonic distance sensor measures distance by using ultrasonic waves, and so it can be used for proximity sensing. It has four pins: VCC, Trig, Echo, and Ground.
If you've got the maqueen or bird bot as well, you can tackle the second part of this guide, where we'll show you how to add obstacle avoidance functionality to your robot. This kind of system can be found used in autonomous cars, and in robots built for all sorts of tournaments.
In this guide, learn how to connect the ultrasonic distance sensor to the micro:bit, and program it to detect the distance from an object. In the second part, learn to create an obstacle avoiding robot with the Bird Bot and Microsoft MakeCode. These first steps will set you on your way to build bigger and better autonomous projects!
Step 2 — Connect GND to GND

Connect a black jumper wire from GND on the sensor to GND on the micro:bit
Step 3 — Connect ECHO to P15
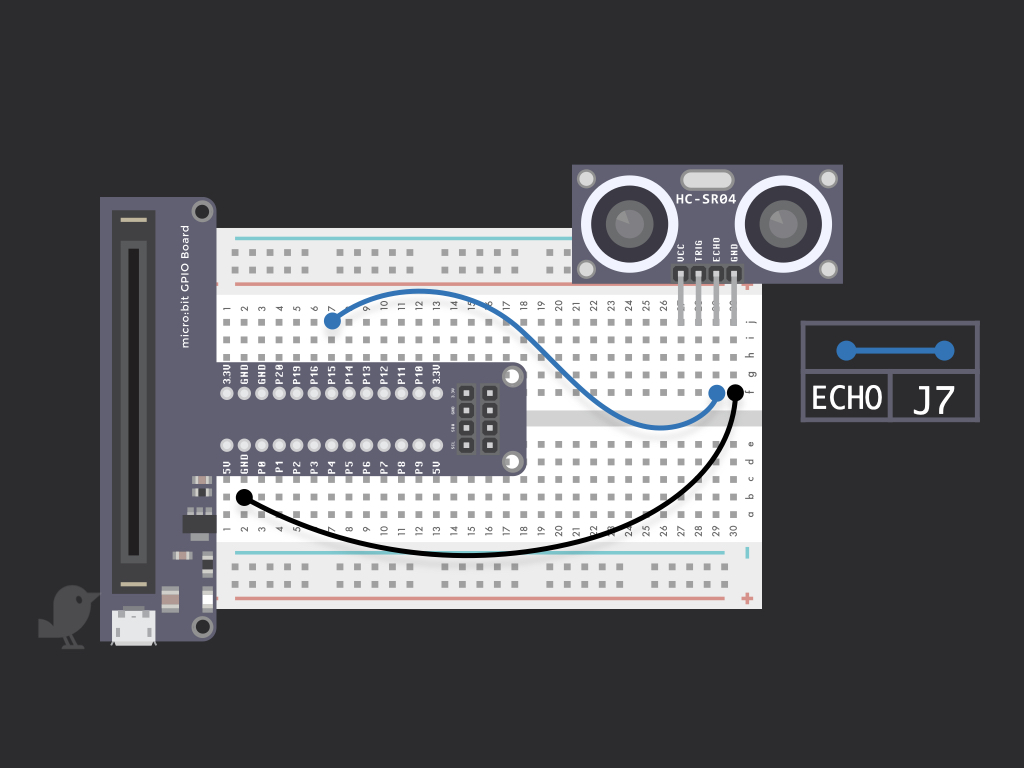
Connect a jumper wire from ECHO on the sensor to P15 on the micro:bit
Step 4 — Connect TRIG to P14
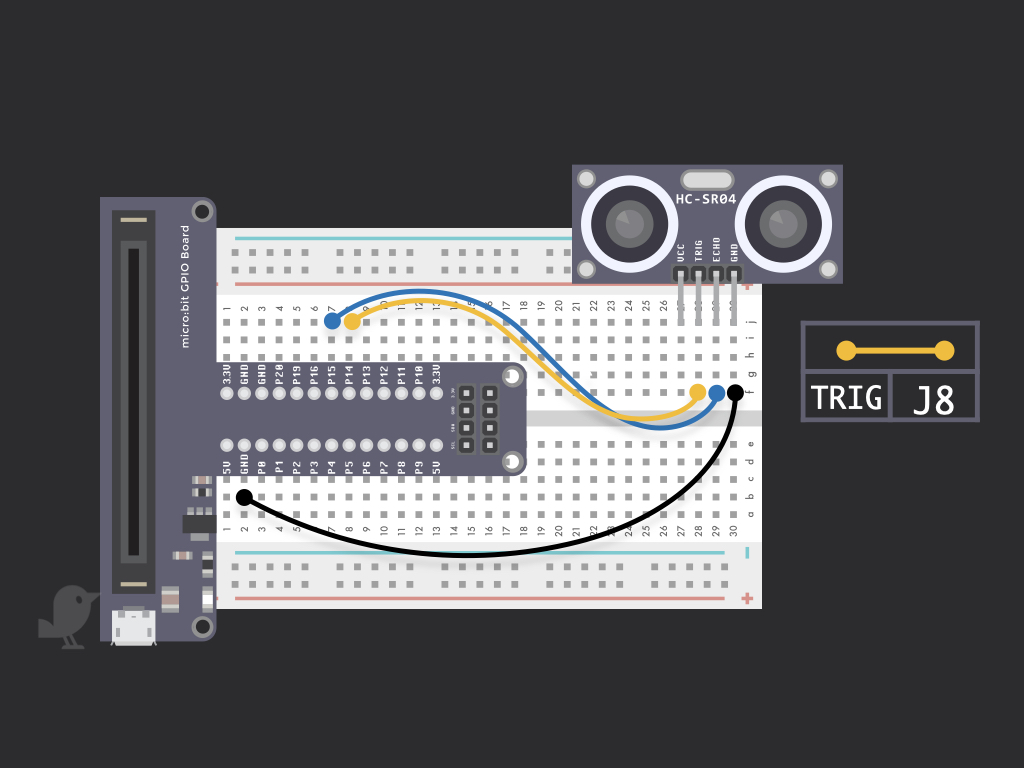
Connect TRIG on the sensor to P14 on the micro:bit
Step 5 — Connect VCC to 3.3V
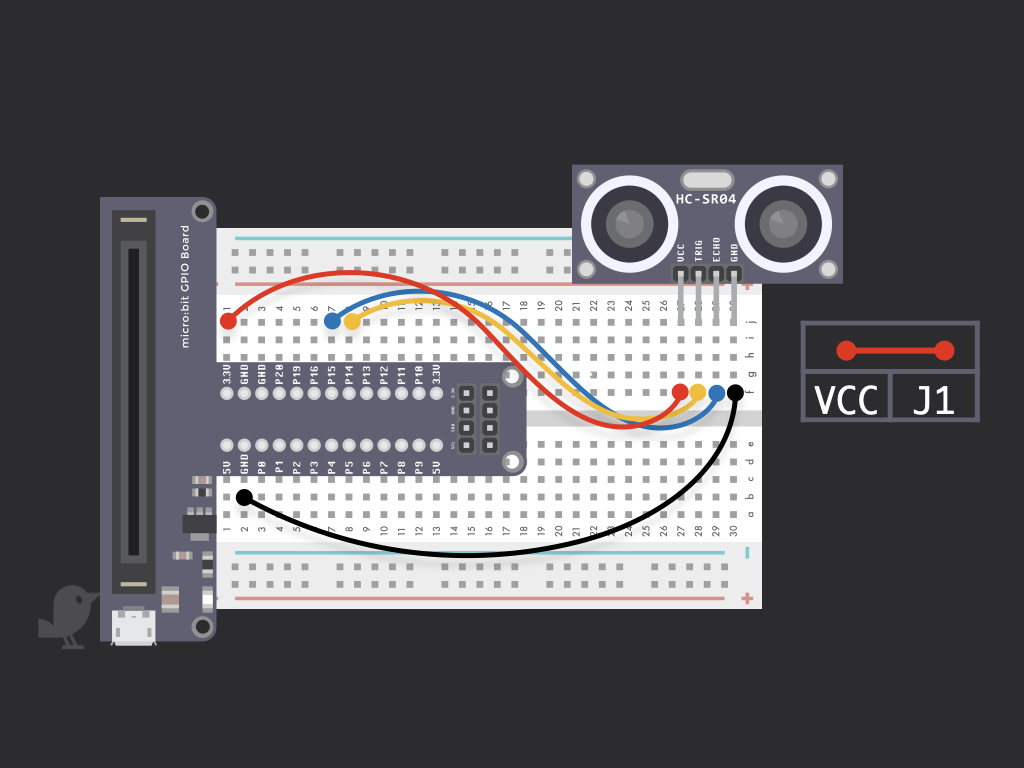
Finally, connect the VCC pin on the sensor to 3.3V on the micro:bit
Step 6 — Add the Sonar extension
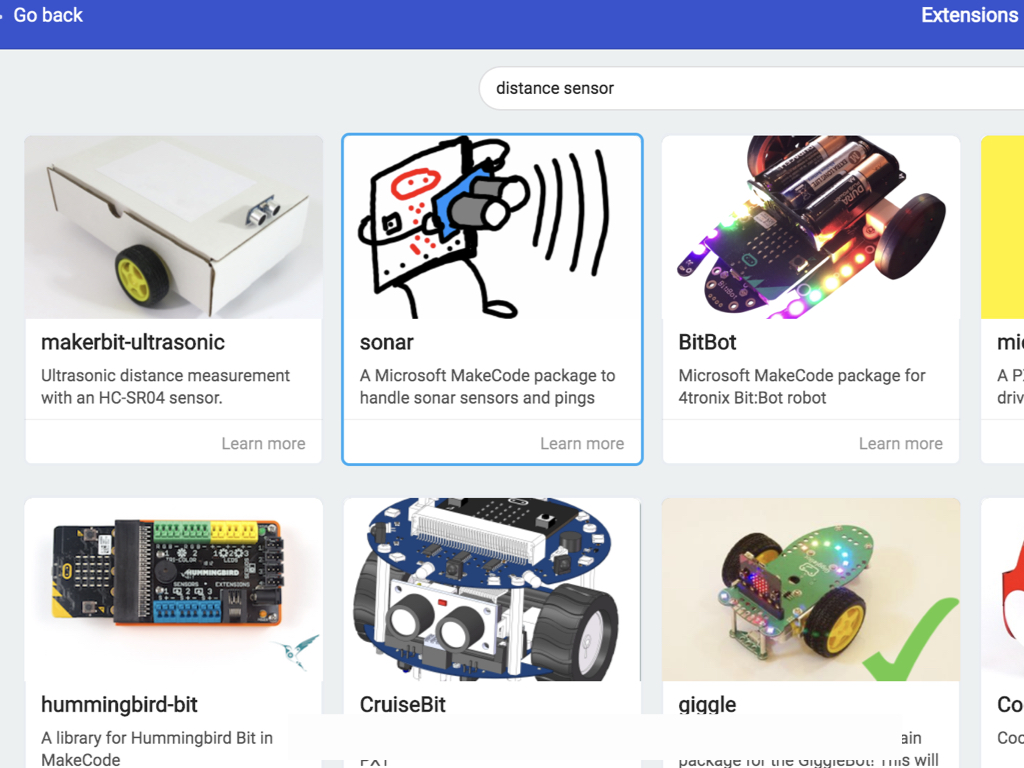
After opening up the MakeCode editor, click on Advanced > Extensions
Click on sonar
Step 7 — Set p to ping block
As there isn't an option for P14 or P15 from the drop-down menu in Blocks, we'll need to change this with Javascript instead. So go ahead and click on the Javascript button to switch to the Javascript interface.
Set trig to P14 and echo to P15.
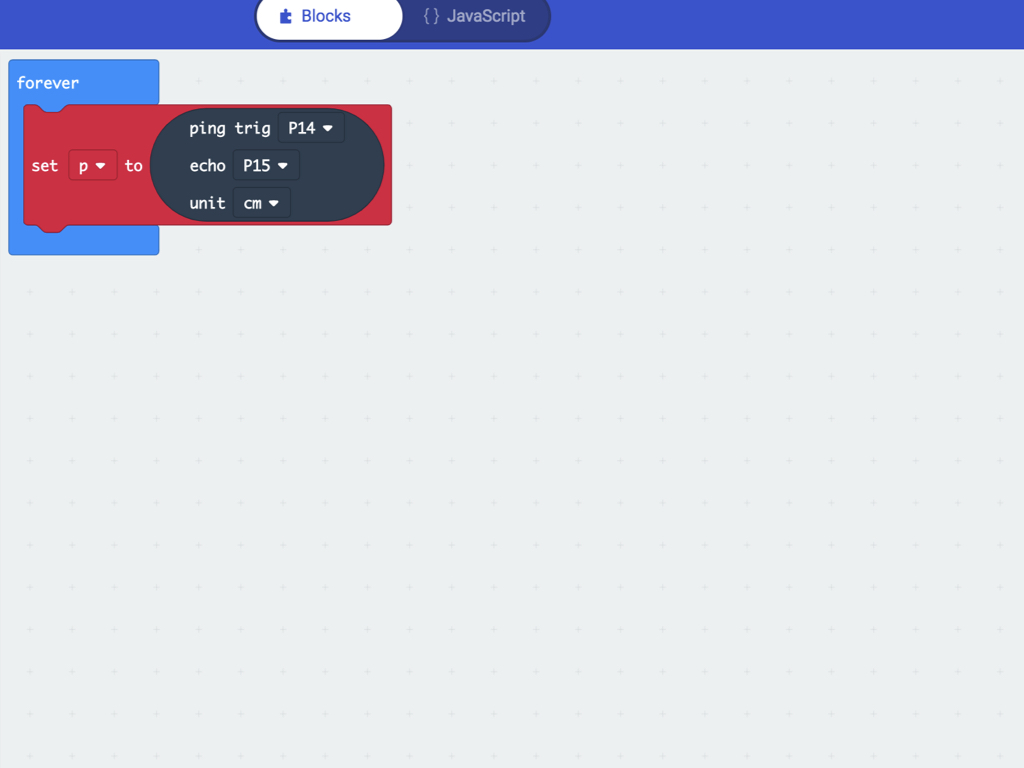
Click on Variables and place a set ... to ... block into the forever block.
Change the value of set ... to ... to set p to ...
From the Sonar category, drag and drop a ping trig ... echo ... unit ... block into set p to ...
Step 8 — Show distance
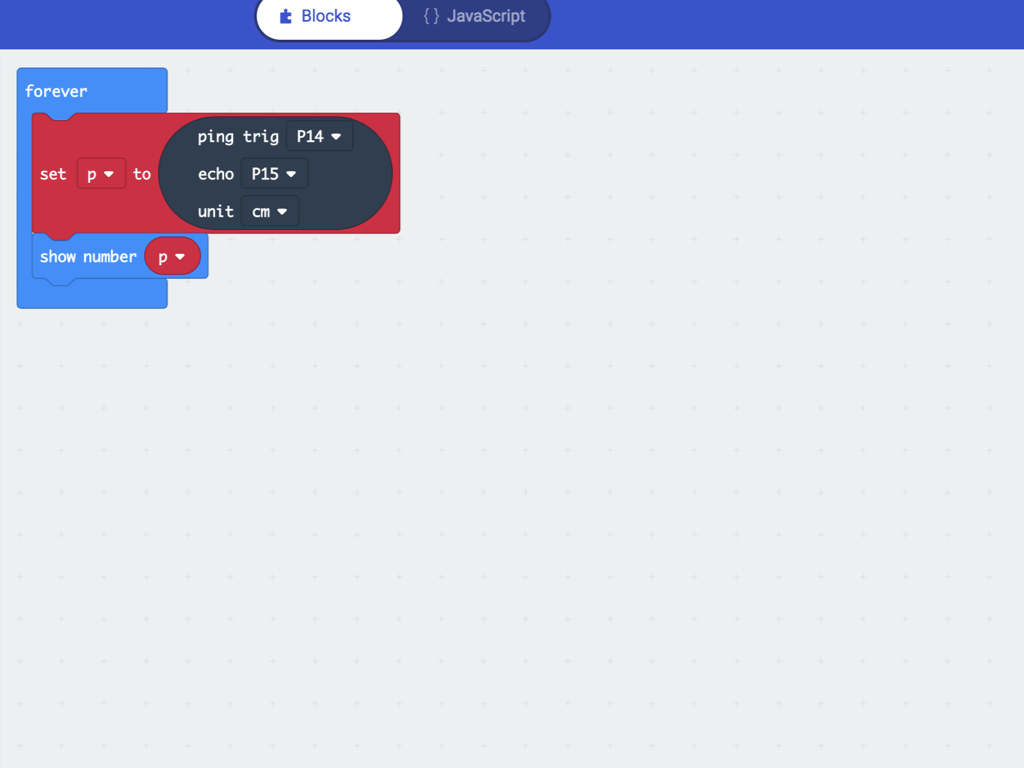
Next, click on Variables category then add a p block into show number
Next, switch back to the Blocks interface and then click on the Basic category
Drag and drop a show number block into forever block
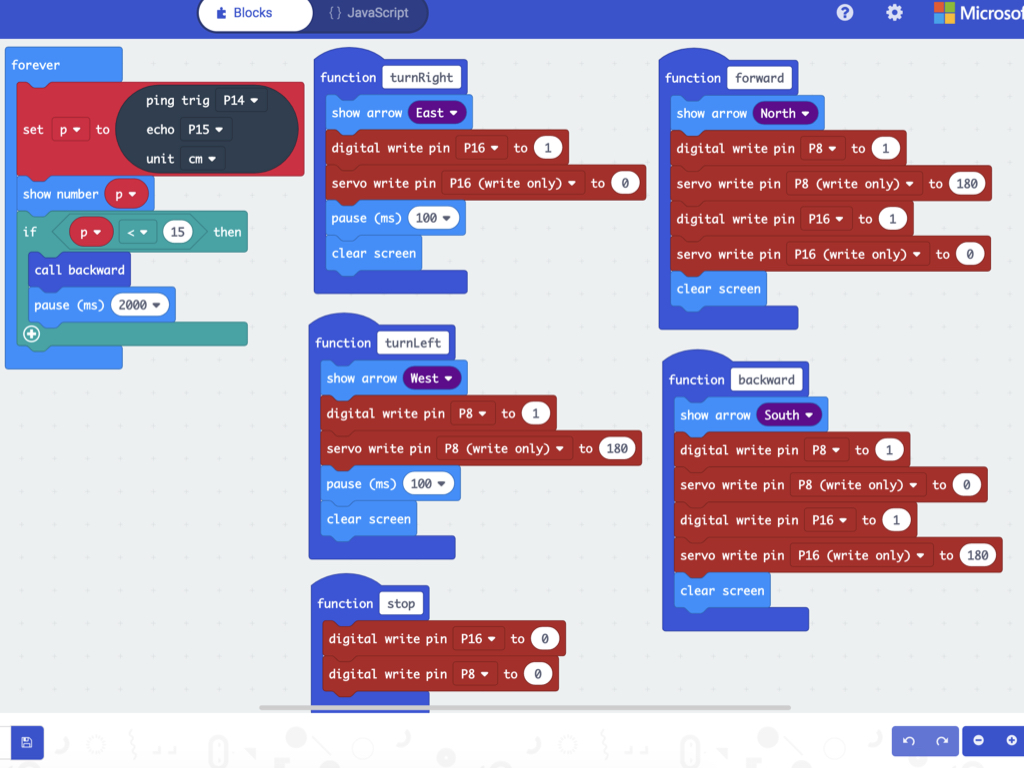
Step 9 — Move backward if p < 15
let p = 0;

function stop () {
    pins.digitalWritePin(DigitalPin.P16, 0);
    pins.digitalWritePin(DigitalPin.P8, 0);
}
function forward () {
    basic.showArrow(ArrowNames.North);
    pins.digitalWritePin(DigitalPin.P8, 1);
    pins.servoWritePin(AnalogPin.P8, 180);
    pins.digitalWritePin(DigitalPin.P16, 1);
    pins.servoWritePin(AnalogPin.P16, 0);
    basic.clearScreen();
}
function backward () {
    basic.showArrow(ArrowNames.South);
    pins.digitalWritePin(DigitalPin.P8, 1);
    pins.servoWritePin(AnalogPin.P8, 0);
    pins.digitalWritePin(DigitalPin.P16, 1);
    pins.servoWritePin(AnalogPin.P16, 180);
    basic.clearScreen();
}

function turnLeft () {
    basic.showArrow(ArrowNames.West);
    pins.digitalWritePin(DigitalPin.P8, 1);
    pins.servoWritePin(AnalogPin.P8, 180);
    basic.pause(100);
    basic.clearScreen();
}
function turnRight () {
    basic.showArrow(ArrowNames.East);
    pins.digitalWritePin(DigitalPin.P16, 1);
    pins.servoWritePin(AnalogPin.P16, 0);
    basic.pause(100);
    basic.clearScreen();
}

basic.forever(function () {
    p = sonar.ping(
    DigitalPin.P14,
    DigitalPin.P15,
    PingUnit.Centimeters
    )
    basic.showNumber(p);
    if (p < 15) {
        backward();
        basic.pause(2000);
    }
})
Copy and paste the following code into the Javascript interface.
Step 10 — Move backward if p < 15 (Blocks interface)
Swap over to the Blocks interface by clicking on Blocks up the top middle of the editor.
You should now see the blocks used in First Steps with Bird Bot. Except, with the addition of a forever block, a ping block, and a conditional statement that will get the Bird Bot moving according to the distance from an obstacle. Try changing the value in the condition and see what happens: if p < 15 then
Step 11 — Else move forward and turn right
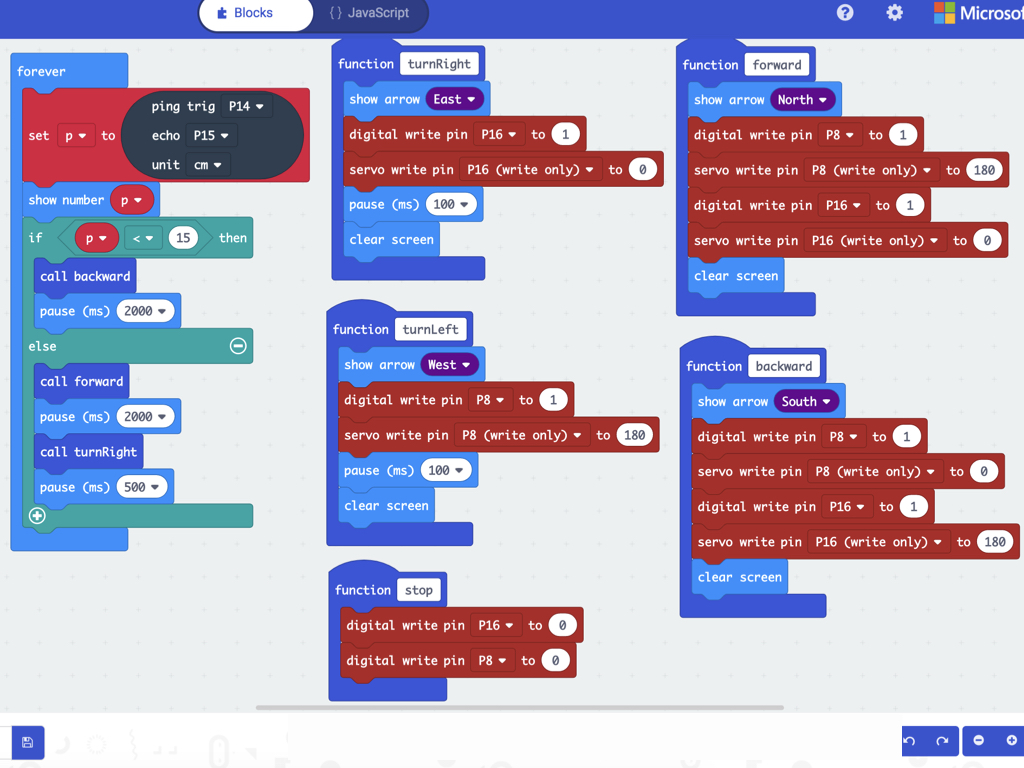
Next, add a call turnRight block.
Likewise, right after it add a pause (ms) 500 block so that the Bird Bot turns right for 500 milliseconds.
Next, replace the if ... then block with an if ... then ... else ... block.
Move the same condition block into if ... then
Let's program the Bird Bot so that if the distance between it and an object is greater than 15cm, it will move forward. Go ahead and first add a call forward block into else.
Add a pause (ms) 2000 block right after it so that the Bird Bot moves forward for 2 seconds.
Step 12 — If p <= 5 then
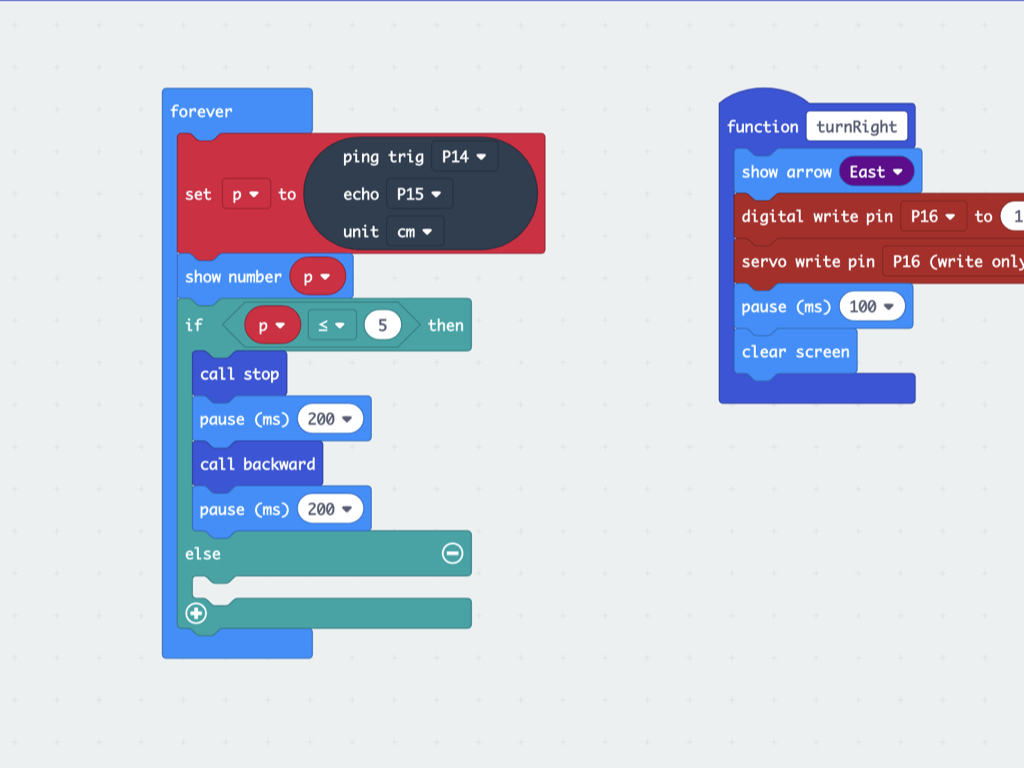
Rather than have the Bird Bot move in reverse when there is an obstacle < 15cm from it, let's change the condition to make it more optimal. Create a new condition so that if the Bird Bot is <= 5cm from an obstacle, call the stop function.
Add a pause (ms) 200 block so that it stops for 200 milliseconds.
Now add a call backward block so that it reverses.
For it to reverse for 2 seconds, add a pause (ms) 200 block right after.
Step 13 — Pick random number to turn left or right
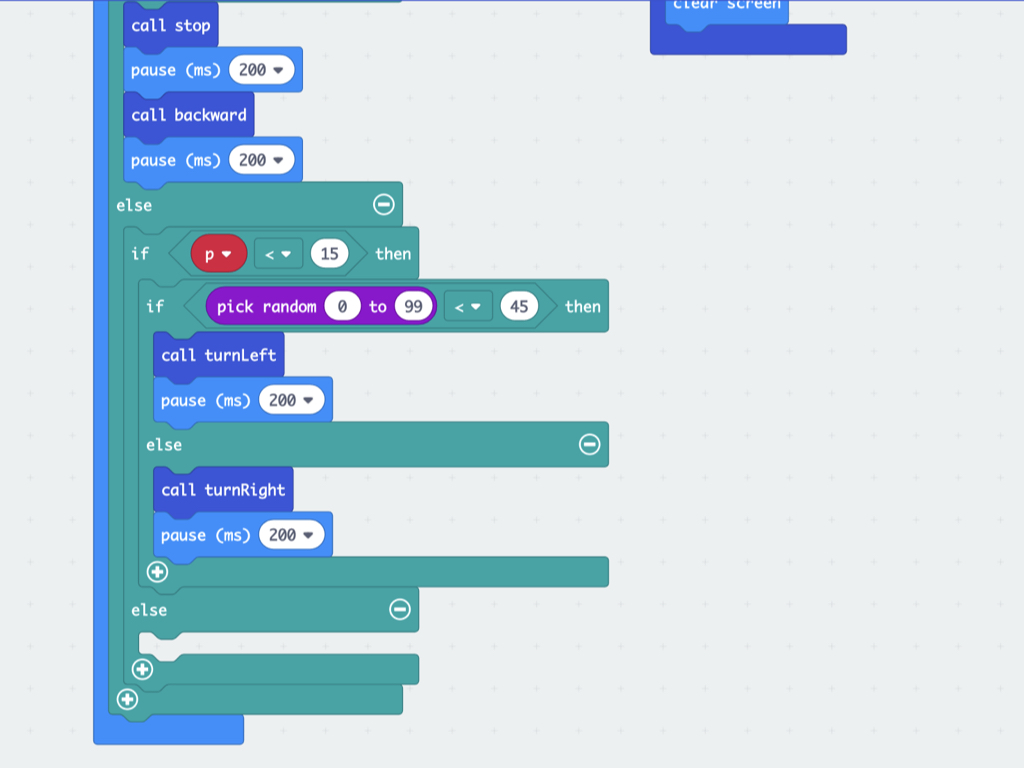
Using a pick random ... to ... block, we can set the Bird Bot to turn right or left depending on the randomly generated number. Within a if p < 15 then block, add another if statement within. This time, with the condition : if pick random 0 to 99 < 45 then
Add the following code blocks as shown so that when the distance from an obstacle is less than 15cm, a random number is generated. If the number generated is less than 45, the Bird Bot will turn left.
Otherwise, get the Bird Bot to turn right with a call turnRight block followed by pause (ms) 200 so that it turns right for 200 milliseconds.
Step 14 — Else ...
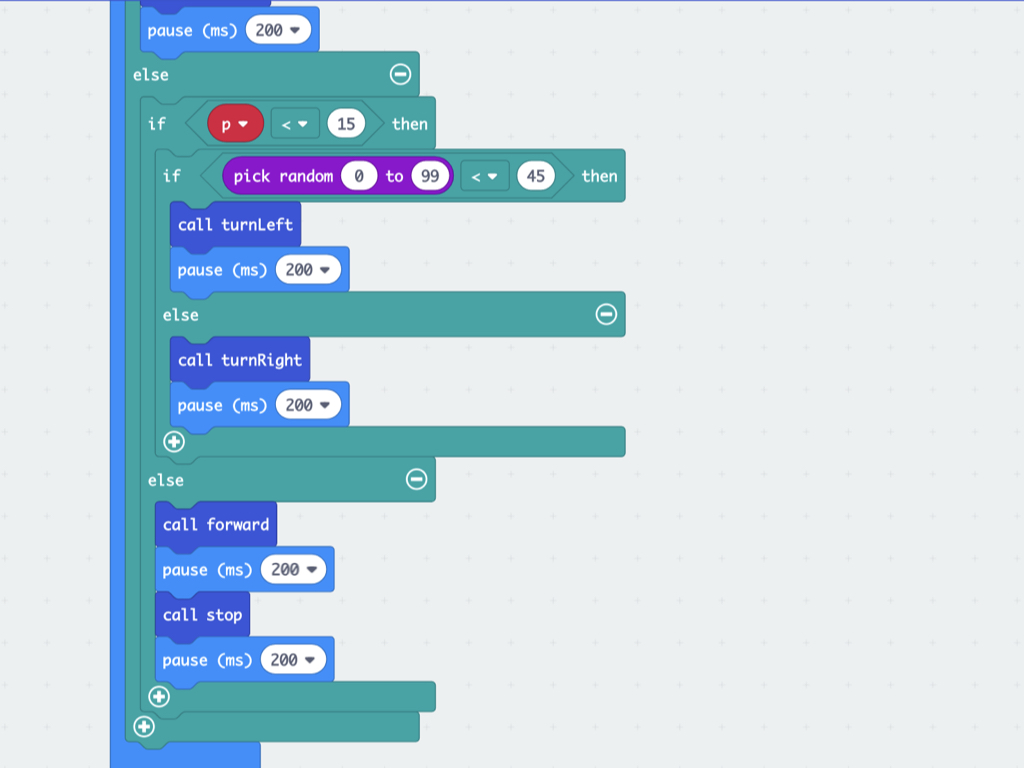
Finally, add a final condition in else
Add a call forward block to it
Then add a pause (ms) 200 block right after it
Add a call stop block
Then add a call pause (ms) 200 block
Step 15 — Final code
let p = 0;
function turnRight () {
    basic.showArrow(ArrowNames.East);
    pins.digitalWritePin(DigitalPin.P16, 1);
    pins.servoWritePin(AnalogPin.P16, 0);
    basic.pause(100);
    basic.clearScreen();
}
function forward () {
    basic.showArrow(ArrowNames.North);
    pins.digitalWritePin(DigitalPin.P8, 1);
    pins.servoWritePin(AnalogPin.P8, 180);
    pins.digitalWritePin(DigitalPin.P16, 1);
    pins.servoWritePin(AnalogPin.P16, 0);
    basic.clearScreen();
}
function turnLeft () {
    basic.showArrow(ArrowNames.West);
    pins.digitalWritePin(DigitalPin.P8, 1);
    pins.servoWritePin(AnalogPin.P8, 180);
    basic.pause(100);
    basic.clearScreen();
}
function backward () {
    basic.showArrow(ArrowNames.South);
    pins.digitalWritePin(DigitalPin.P8, 1);
    pins.servoWritePin(AnalogPin.P8, 0);
    pins.digitalWritePin(DigitalPin.P16, 1);
    pins.servoWritePin(AnalogPin.P16, 180);
    basic.clearScreen();
}
function stop () {
    pins.digitalWritePin(DigitalPin.P16, 0);
    pins.digitalWritePin(DigitalPin.P8, 0);
}
basic.forever(function () {
    p = sonar.ping(
    DigitalPin.P14,
    DigitalPin.P15,
    PingUnit.Centimeters
    )
    basic.showNumber(p);
    if (p <= 5) {
        stop();
        basic.pause(200);
        backward();
        basic.pause(200);
    } else {
        if (p < 15) {
            if (Math.randomRange(0, 99) < 45) {
                turnLeft();
                basic.pause(200);
            } else {
                turnRight();
                basic.pause(200);
            }
        } else {
            forward();
            basic.pause(200);
            stop();
            basic.pause(200);
        }
    }
})
Once complete, the code should look like what we got on the left.
Feel free to copy and paste the following code into the Javascript interface, or download the complete hex file here.
Step 16 — Upload the code to micro:bit
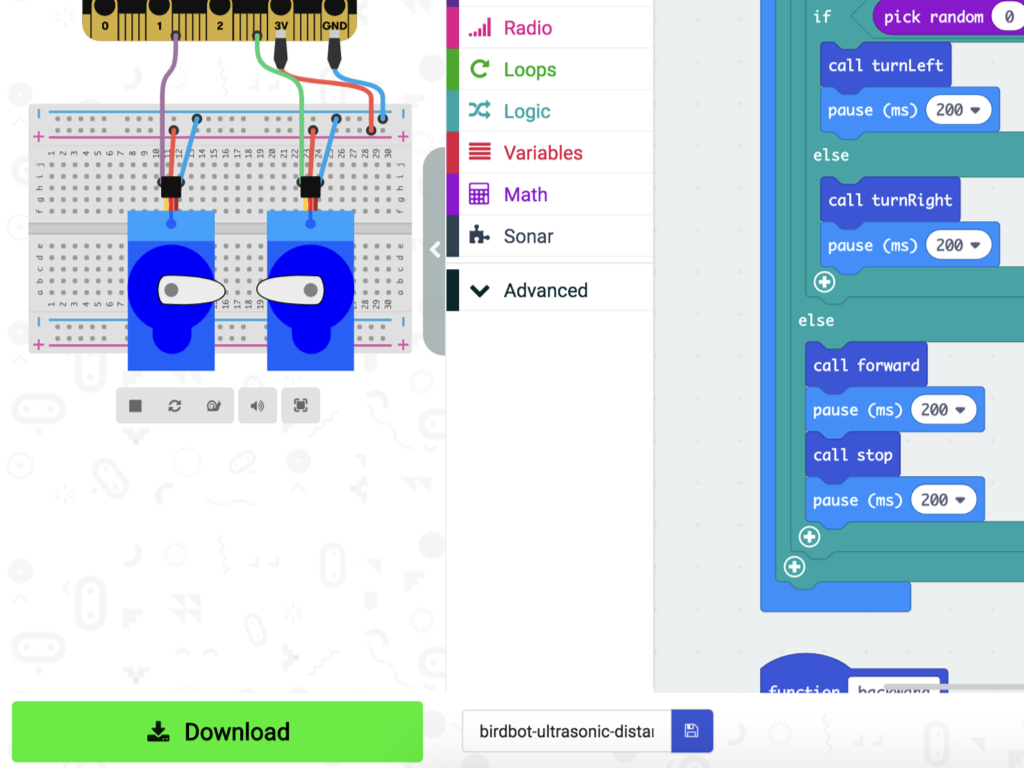
To upload the code to the Bird Bot, first connect the micro:bit to the computer via microUSB cable.
Click on the Download button and the hex file will be automatically downloaded to your 'Downloads' folder.
Drag and drop the downloaded microbit-birdbot-ultrasonic-distance-sensor.hex file to the MICROBIT drive.
Leave the micro:bit alone for a few seconds as it blinks. The code is uploading.
Step 17 — Conclusion
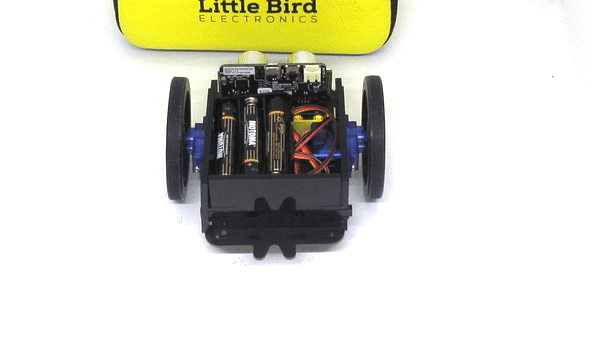
Power up the Bird Bot with 3 x AAA batteries.
Please make sure to use brand new or charged AAA batteries!
Now when the Bird Bot is powered up, the robot will move forward unless there is an obstacle in its view. Otherwise, if there is an obstacle within 5cm or less in its view, it will drive backward. It may also turn right or left depending on a randomly generated number.
Check out the guides over at https://www.littlebird.com.au/a/how-to/#micro-bit to learn even more!
Check out the guides over at https://www.littlebird.com.au/a/how-to/#micro-bit to learn even more!
Parts List
Required Parts (1)
Project Summary
1 part total
Required parts
$79.35
Total (required)
$79.35
Unavailable items will be skipped
