Robot Alarm Clock with Bird Bot
Turn the Bird Bot into a moving alarm clock!
Written By: Cherie Tan
Difficulty
Medium
Steps
14
So maybe you have built an obstacle-avoidant mobile robot, but why not go one step further and turn the Bird Bot into a moving alarm clock?
In this guide, we will show you how to add an active buzzer module to the Bird Bot, and program a timer and clock display, so that it will move around and sound an alarm based on the set time. It's perfect for those who hit the snooze button one too many times on a regular clock, as there isn't one on this one!
Complete this guide to turn your Bird Bot into a robot alarm clock.
Building an obstacle-avoidant mobile robot is cool, but why not go one step further and turn the Bird Bot into a moving alarm clock? In this guide, we will show you how to add an active buzzer module to the Bird Bot, and program a timer and clock display, so that it will move around and sound an alarm based on the set time.
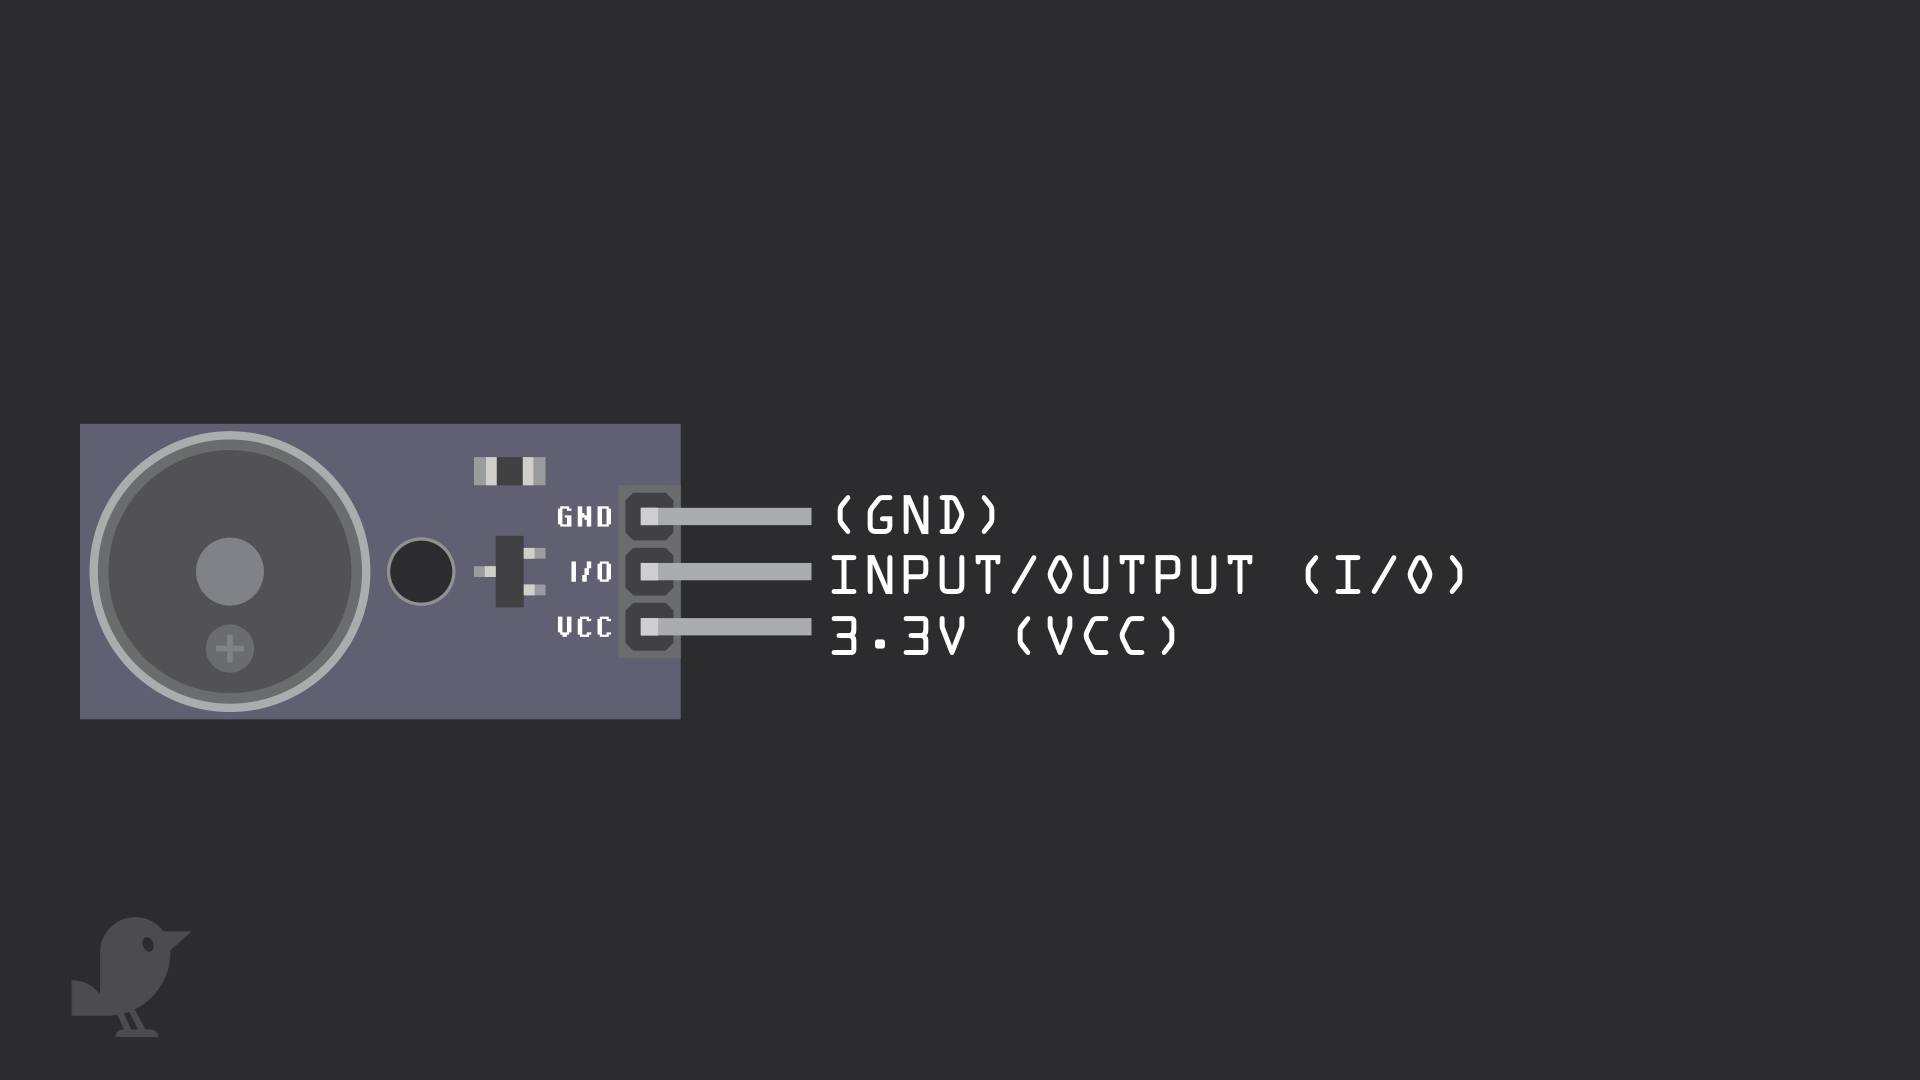
Connect the buzzer module to the Bird Bot as such:
VCC to 3.3V
GND to GND
I/O to P0
VCC to 3.3V
GND to GND
I/O to P0
The buzzer module has three pins:
3.3V : While 'VCC' stands for Voltage Common Collector, we'll connect the VCC pin to 3.3V on the micro:bit
I/O: Input/Output
GND: Ground
3.3V : While 'VCC' stands for Voltage Common Collector, we'll connect the VCC pin to 3.3V on the micro:bit
I/O: Input/Output
GND: Ground
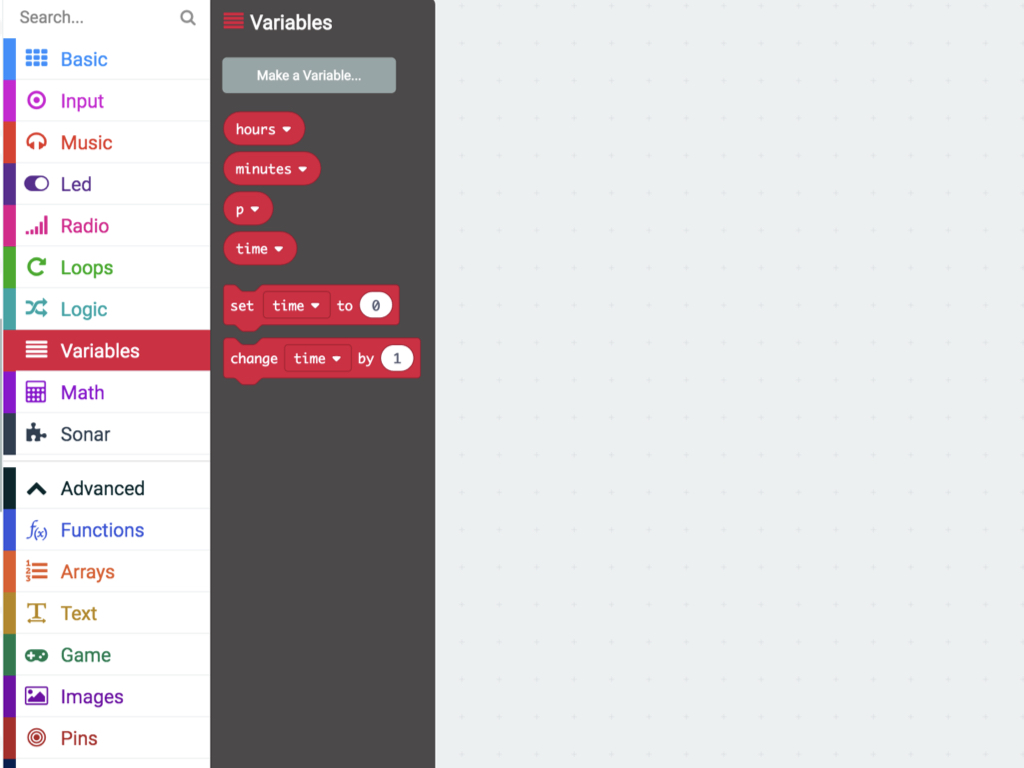
With the MakeCode editor open, the first thing to do is to create new variables. So click on the Variables category.
Then click on Make a Variable...
Name the first variable, hours
Then create a second variable, minutes
Next, create a third variable, time
Now that we've got the variables that will help keep track of time, it's time to code the timer.
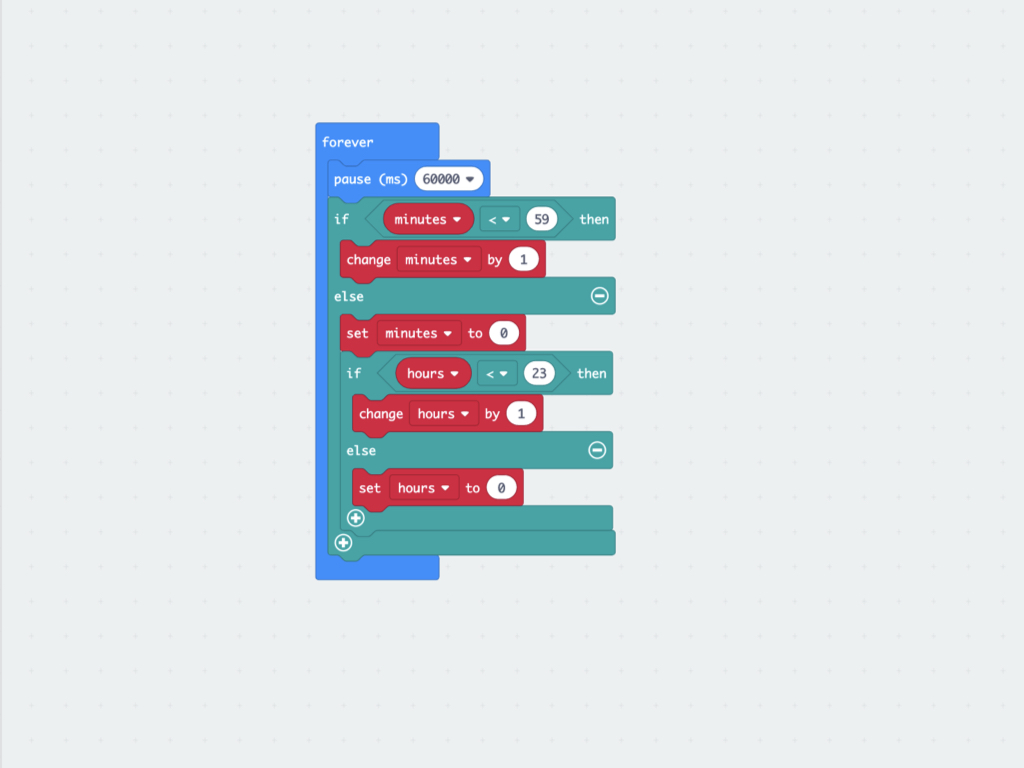
A clock has three parts to it: a display, settings, and a timer. To make the minutes and hours count up to the right time, first drag and drop a pause (ms) 60000 block into a forever block.
Next, create a new condition with if ... then so that if minutes < 59 then change minutes by 1
Complete the condition so that else set minutes to 0
Within else, add another if ... then ... else block. This time, create another condition so that if hours < 23 then change hours by 1.
Complete this condition with else set hours to 0
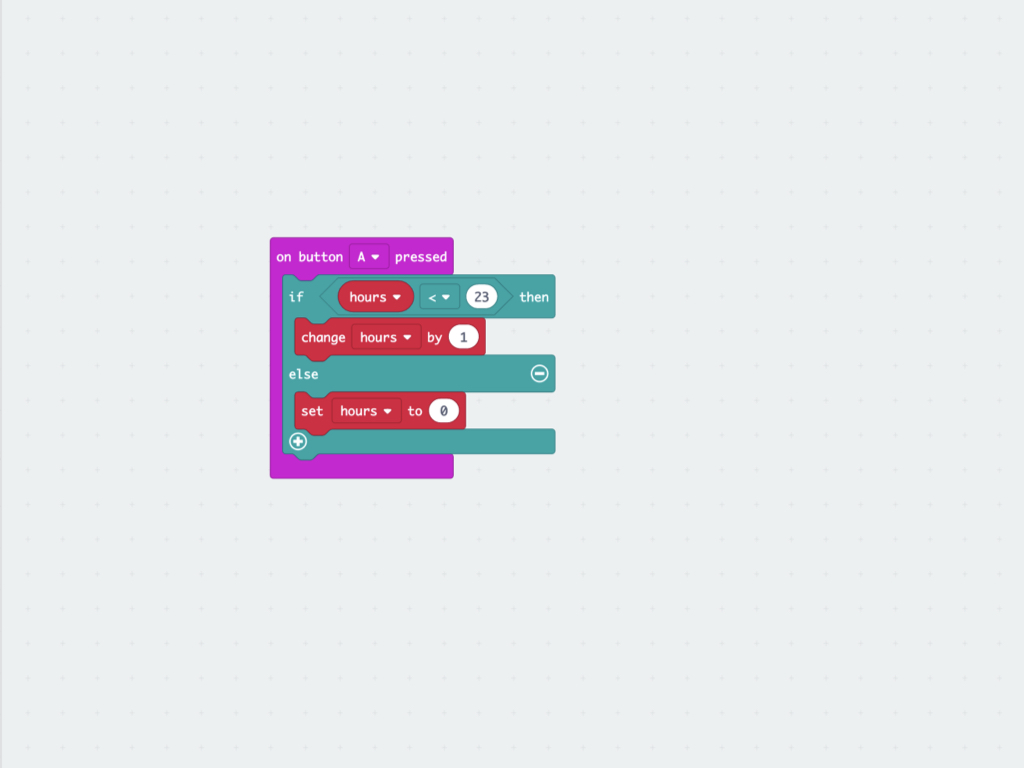
To set the time, we will use buttons A and B on the micro:bit. Button A will be programmed to set the hours. So go ahead and click on the Input category.
Click and drag out a on button A pressed block into the editor
Next, click on Logic category and create a condition with an if ... then block so that if hours < 23 then change hours by 1
Complete the condition: else set hours to 0
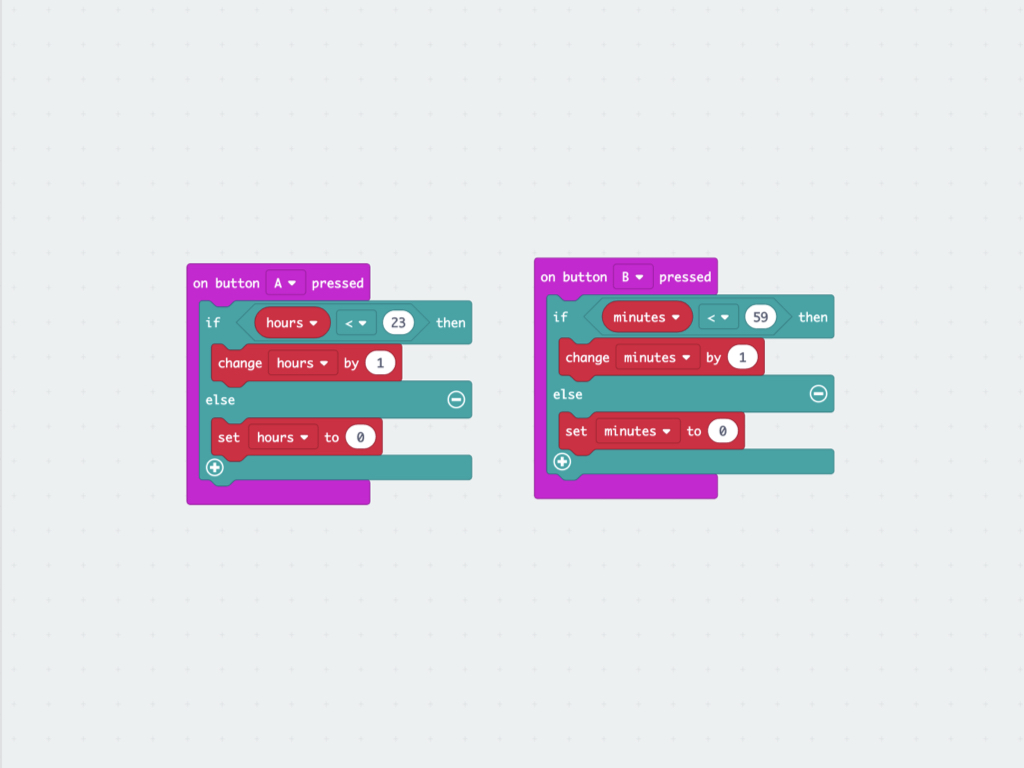
Likewise, we can use button B to set the minutes for the alarm clock. So as you did before, click on the Input category then drag out a on button A pressed block!
Change it to on button B pressed.
Then create another condition, this time if minutes < 59 then change minutes by 1
Go ahead and complete the condition with else set minutes to 0
Then, from Input click and drag out a show string block
Attach a time block to it
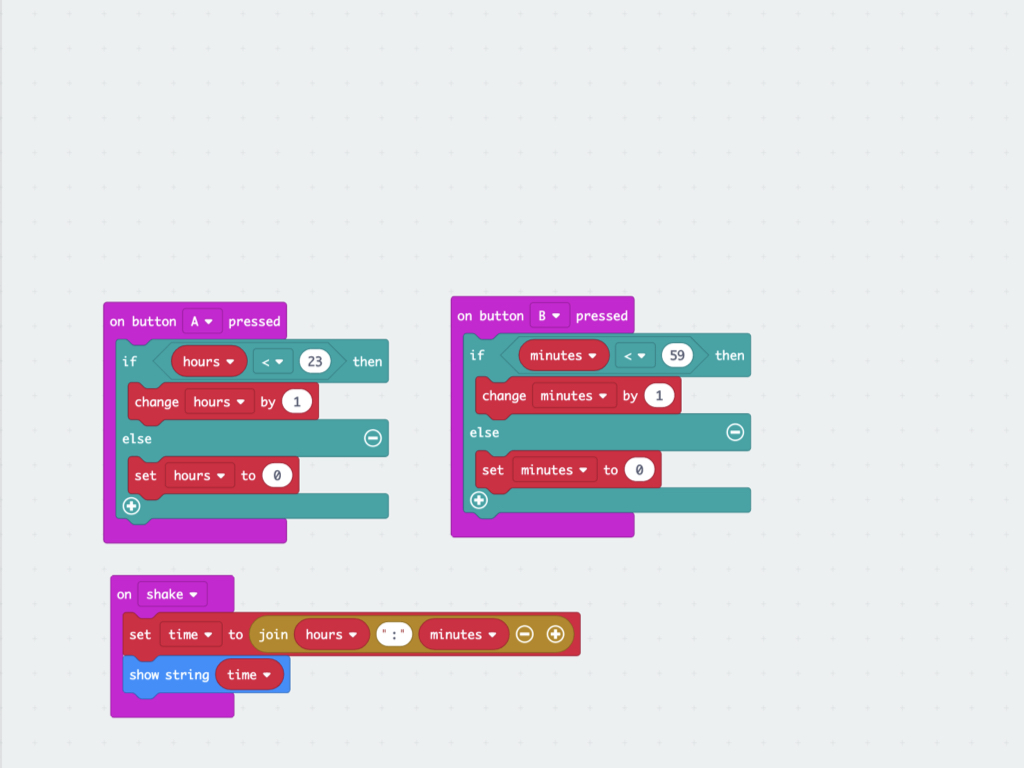
While there is now a way to set the hours and minutes, there still needs to be a way to display the current time. The micro:bit has a built-in accelerometer which allows it to recognise certain gestures, such as if it is being shook. To get it to do so, from Input category, click and drag out an on shake block.
Next, from Variables, get out a set ... to ... block
From the Text category, get out a join block.
Drag and drop an hours and minutes block from Variables category. Then combine it so that it reads set time to join hours ":" minutes
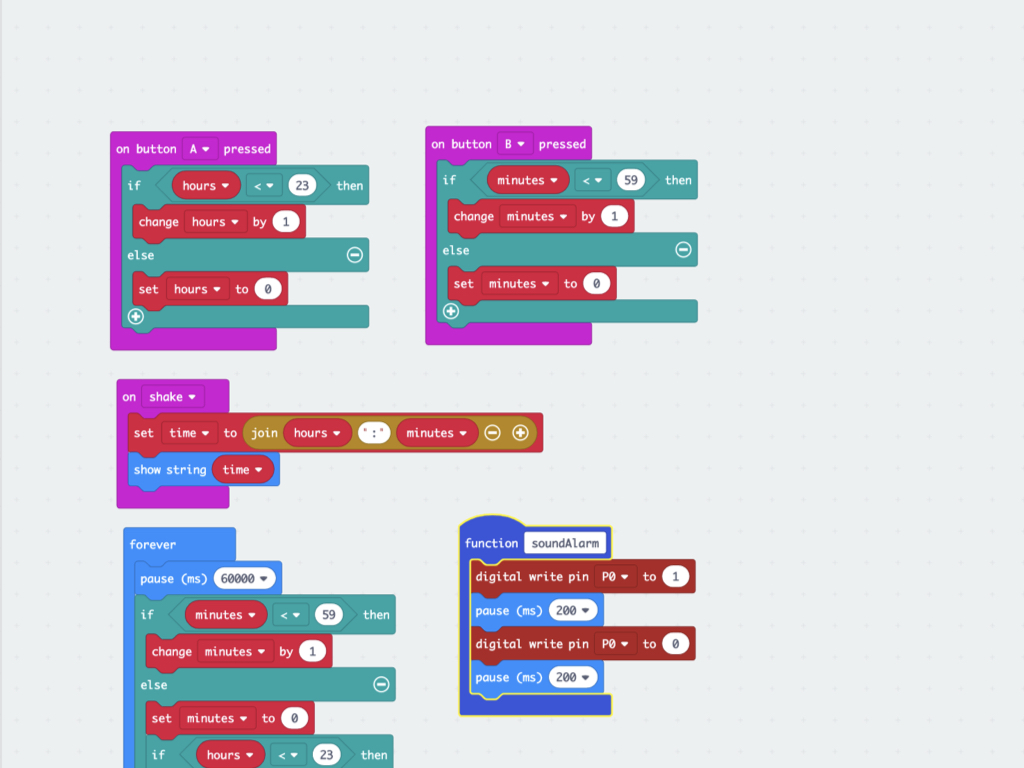
Now that the alarm can be set to the exact hours and minutes of our choosing, and the timer is counting as long as the Bird Bot is powered, we still need the robot alarm clock to make a sound. Create a new function and name it soundAlarm.
Then from the Pins category, click and drag out two digital write pin P0 to 0 blocks
Set one of these blocks to digital write pin P0 to 1
Add a pause (ms) 200 block in between digital write pin P0 to 1 and digital write pin P0 to 0
Drag and drop another pause (ms) 200 block right after it
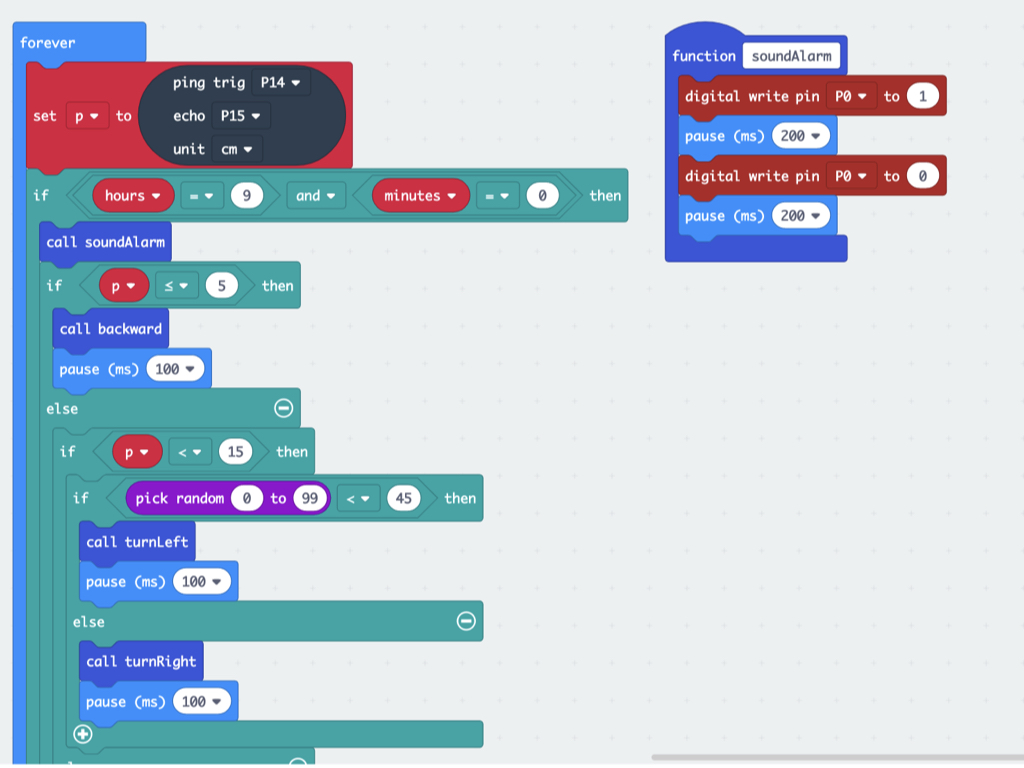
Copy and paste the complete Javascript code from the previous guide, Obstacle Avoidance with Bird Bot, into the Javascript interface of the new project. We will re-use the code to get the Bird Bot to move and navigate its way around obstacles, except with a few changes. Over in the second forever loop, add a condition if hours = 9 and minutes = 0 then ... else ...
Place the existing code within the if ... then ... part of this new condition.
Add a call soundAlarm block right after if hours = 9 and minutes = 0 then
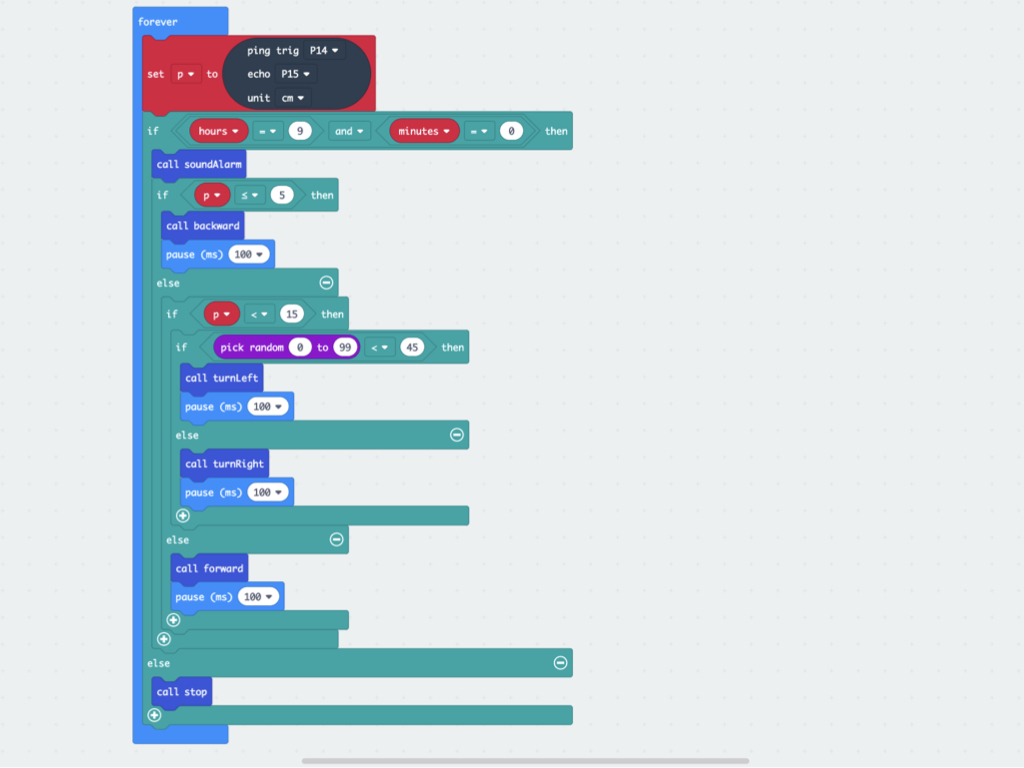
Let's get the Bird Bot to stop moving once the time has gone past the set time, for example, 9:01am.
To do so, complete the if ... then ... else ... condition by adding a call stop block as shown.
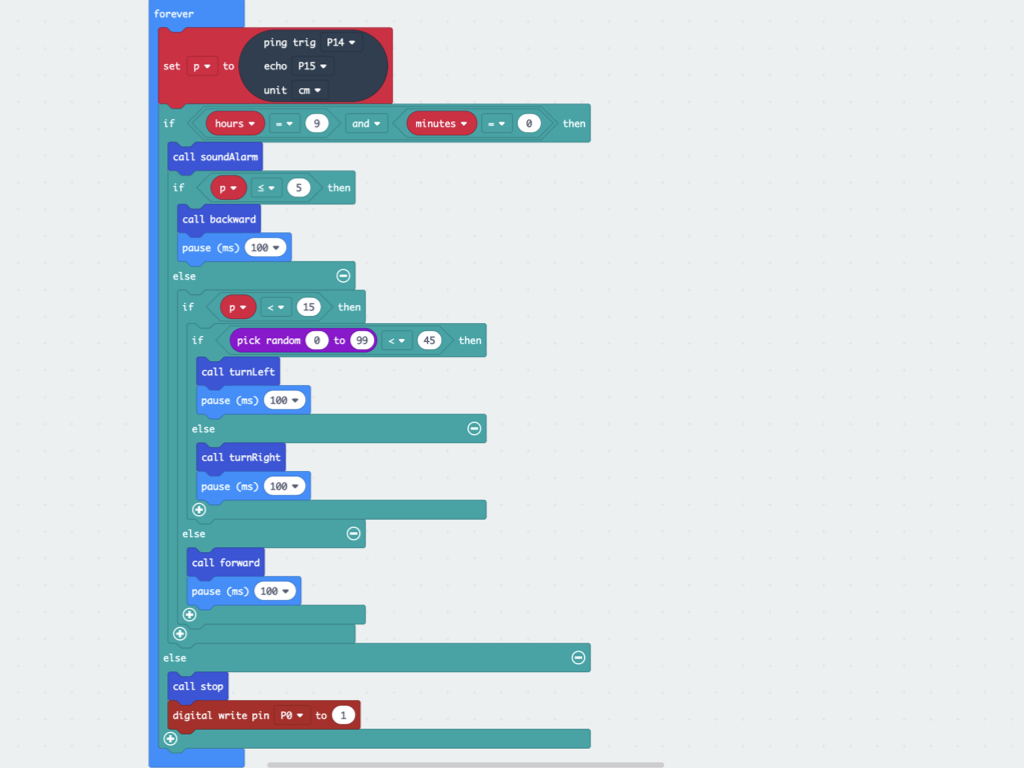
Finally, to get the buzzer module to stop sounding, add a digital write pin P0 to 1 block right after call stop.
You might be wondering why we've set pin P0 to "1" to turn it off. When working with sensor modules and their pins, you will likely encounter some pins that are either "active low" or "active high".
The buzzer module's pin used in this guide has an "active low" instead of an "active high". This describes how the pin is activated. What this basically means is that in order for the device to be active (if it is an active-low) then you must "pull" that pin LOW by connecting it to GND. Depending on the buzzer module you are using, the pin may or may not be an active low.
The buzzer module's pin used in this guide has an "active low" instead of an "active high". This describes how the pin is activated. What this basically means is that in order for the device to be active (if it is an active-low) then you must "pull" that pin LOW by connecting it to GND. Depending on the buzzer module you are using, the pin may or may not be an active low.
let hours = 0;
let minutes = 0;
let time = "";
let p = 0;
input.onButtonPressed(Button.A, function () {
    if (hours < 23) {
        hours += 1;
    } else {
        hours = 0;
    }
})
input.onButtonPressed(Button.B, function () {
    if (minutes < 59) {
        minutes += 1;
    } else {
        minutes = 0;
    }
})
function turnRight () {
    pins.digitalWritePin(DigitalPin.P16, 1);
    pins.servoWritePin(AnalogPin.P16, 0);
    basic.pause(100);
}
function turnLeft () {
    pins.digitalWritePin(DigitalPin.P8, 1);
    pins.servoWritePin(AnalogPin.P8, 180);
    basic.pause(100);
}
function stop () {
    pins.digitalWritePin(DigitalPin.P16, 0);
    pins.digitalWritePin(DigitalPin.P8, 0);
}
input.onGesture(Gesture.Shake, function () {
    time = "" + hours + ":" + minutes;
    basic.showString(time);
})
function backward () {
    pins.digitalWritePin(DigitalPin.P8, 1);
    pins.servoWritePin(AnalogPin.P8, 0);
    pins.digitalWritePin(DigitalPin.P16, 1);
    pins.servoWritePin(AnalogPin.P16, 180);
}
function forward () {
    pins.digitalWritePin(DigitalPin.P8, 1);
    pins.servoWritePin(AnalogPin.P8, 180);
    pins.digitalWritePin(DigitalPin.P16, 1);
    pins.servoWritePin(AnalogPin.P16, 0);
}
function soundAlarm () {
    pins.digitalWritePin(DigitalPin.P0, 1);
    basic.pause(200);
    pins.digitalWritePin(DigitalPin.P0, 0);
    basic.pause(200);
}
basic.forever(function () {
    basic.pause(60000);
    if (minutes < 59) {
        minutes += 1;
    } else {
        minutes = 0;
        if (hours < 23) {
            hours += 1;
        } else {
            hours = 0;
        }
    }
})
basic.forever(function () {
    p = sonar.ping(
    DigitalPin.P14,
    DigitalPin.P15,
    PingUnit.Centimeters
    )
    if (hours == 9 && minutes == 0) {
        soundAlarm();
        if (p <= 5) {
            backward();
            basic.pause(100);
        } else {
            if (p < 15) {
                if (Math.randomRange(0, 99) < 45) {
                    turnLeft();
                    basic.pause(100);
                } else {
                    turnRight();
                    basic.pause(100);
                }
            } else {
                forward();
                basic.pause(100);
            }
        }
    } else {
        stop();
        pins.digitalWritePin(DigitalPin.P0, 1);
    }
})
Have you noticed that the alarm clock isn't as accurate? This is because it takes time to display and scroll numbers or symbols on the micro:bit. To optimise it, we have removed the show arrow blocks, and adjusted the pause blocks to improve on timing. You can further adjust the pause blocks to improve more on timing.
Feel free to grab the complete code on the left and paste into the Javascript interface.
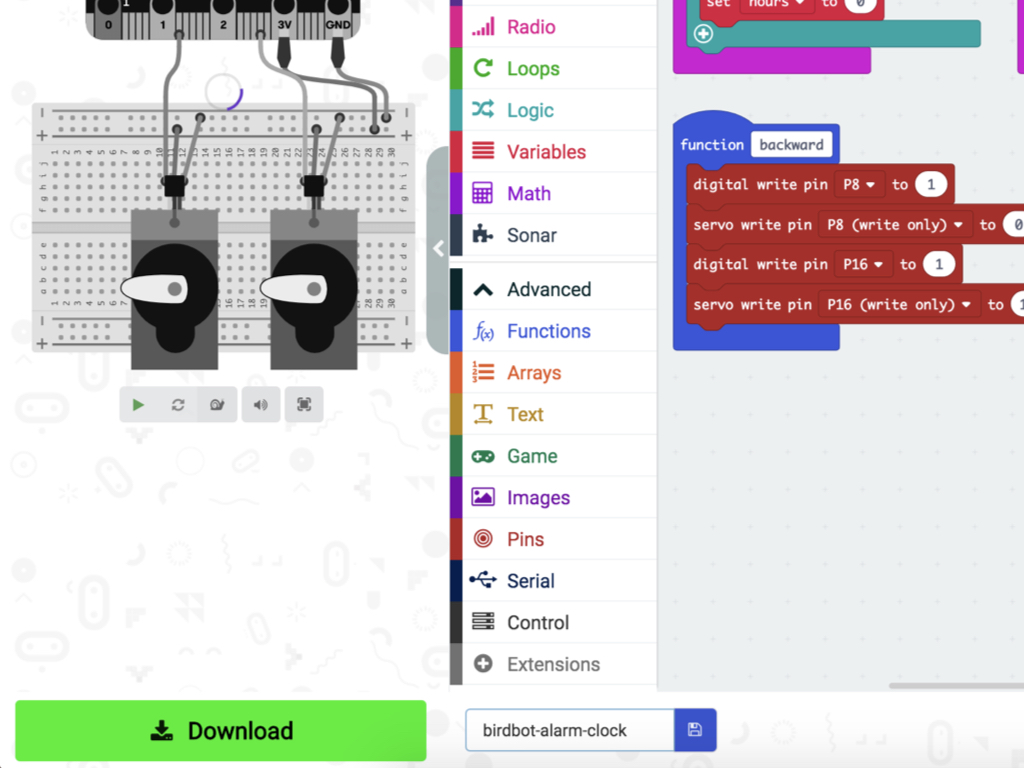
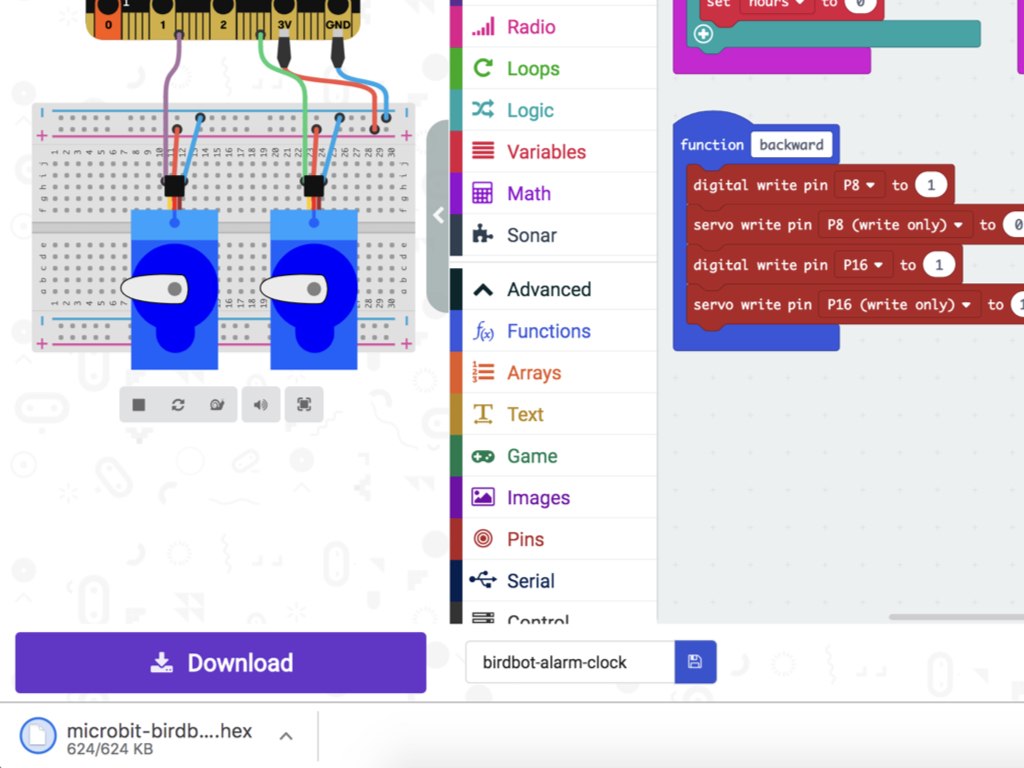
To upload the code to the Bird Bot, first connect the micro:bit to the computer via microUSB cable.
Click on the Download button and the hex file will be automatically downloaded to your 'Downloads' folder.
Drag and drop the downloaded microbit-birdbot-alarm-clock.hex file to the MICROBIT drive.
Leave the micro:bit alone for a few seconds as it blinks. The code is uploading.
Check out the guides over at https://www.littlebird.com.au/a/how-to/#micro-bit to learn even more!
You can watch the full video with sound here.
Please make sure to use brand new or charged AAA batteries!
Now when the Bird Bot is powered up and the time set, it will move just as it did before in Obstacle Avoidance and Bird Bot, but this time while playing an alarm sound. It will keep moving and playing a sound until it has passed 9:00am (or what was set on the alarm)!
Here are some suggestions on how to make it better:
1. Try using a passive buzzer module instead of an active buzzer, so as to play tunes with the blocks in the Music category in MakeCode editor.
1. Try using a passive buzzer module instead of an active buzzer, so as to play tunes with the blocks in the Music category in MakeCode editor.
2. Display all digits for the minutes; at the moment it is displaying 9 : 1 for 9:01am.
Want a hint? Click here.
3. Use a real-time clock (RTC) module. These RTC modules may have EEPROM which can be used to store and re-store the time settings even when the micro:bit has been powered off and then turned back on.